viernes, 11 de mayo de 2012

Programacion C con CM-510: leyendo y moviendo Dynamixel AX-12 (III y ultimo)

Programacion C con CM-510: leyendo y moviendo Dynamixel AX-12 (III y último)

Finalizaremos esta primera serie de programación del CM-510 en C moviendo un Dynamixel AX12 en función de los valores leídos con el sensor DMS.

[caption id="attachment_660" align="aligncenter" width="300" caption="DMS sensor"]DMS sensor[/caption]

La función "main" es así de sencilla:
[sourcecode language="c"]
int main(void)
{
int idAX12=4;
int puertoDelSensorDMS=3;

init();

// los dos ejemplos anterior refactorizados en una función

// ordenesDesdeTerminal();
// datosDesdeOtroAX12();

puts("Situaremos el AX12 en la posicion que nos indique el sensor DMS");
ordenesDesdeSensoresPorPasos(idAX12, puertoDelSensorDMS);

// una prueba cruda
//ordenesDesdeSensoresCrudo();

puts("The End");

return 0;
}
[/sourcecode]

Siendo "void ordenesDesdeSensoresPorPasos(int idAX12, int puertoDelSensor)" la función principal del ejemplo:

[sourcecode language="c"]
void ordenesDesdeSensoresPorPasos(int idAX12, int puertoDelSensor)
{
/*
Para evitar las habituales fluctuaciones que sufren los sensores
sólo tendremos en cuenta las diferencias superiores al siguiente valor
entre la anterior lectura y la actual
*/
int minimaDiferencia=25;
int diferencia=0; // la diferencia entre el valor anterior y el actual

int anteriorValor=0; // el anterior valor obtenido del sensor
int valor=0; // el de la lectura actual

while (true)
{
anteriorValor=valor; // guardamos el anterior valor leído del sensor

valor=leerSensor(puertoDelSensor); // leemos el actual

diferencia=anteriorValor-valor;
//printf("n%i", valor); // por si queremos ir viendo los valores que envía el sensor

_delay_ms(100); // una brevisima pausa

// diferencias menores que esta las consideramos fluctuaciones del sensor
if (abs(diferencia)>minimaDiferencia)
{
// utilizamos el valor leído del sensor como posición a situar el AX12
dxl_write_word( idAX12, P_GOAL_POSITION_L, valor);
}
}
}
[/sourcecode]

Utiliza la función leerSensor que tiene cierta dificultad, ya que utiliza la conversión analógico-digital de los microcontroladores ATMega. De momento no entraremos en los detalles, creo que será mejor explicarlo en una próxima serie que trate cuestiones más avanzadas. De todas formas, por si os despierta la curiosidad, os la incluyo a continuación; está basada en los ejemplos de Robotis:

[sourcecode language="c"]
int leerSensor(unsigned char idPuerto)
{
ADCSRA = (1 << ADEN) | (1 << ADPS2) | (1 << ADPS1); // ADC Enable, Clock 1/64div.

// printf( "nnIR example for CM-510nn" );

asignarPuerto(idPuerto);
//PORTA &= ~0x80;
//PORTA &= ~0x20;

//_delay_us(12); // Short Delay for rising sensor signal
_delay_us(24);
ADCSRA |= (1 << ADIF); // AD-Conversion Interrupt Flag Clear
ADCSRA |= (1 << ADSC); // AD-Conversion Start

while( !(ADCSRA & (1 << ADIF)) ); // Wait until AD-Conversion complete

PORTA = 0xFC; // IR-LED Off

//printf( "%drn", ADC); // Print Value on USART

//_delay_ms(50);
_delay_ms(esperaLeerSensorMS);

return ADC;
}
[/sourcecode]

Y aquí os podéis descargar el ejemplo completo.
miércoles, 9 de mayo de 2012

Programacion C con CM-510: leyendo y moviendo Dynamixel AX-12 (II)

Programación C con CM-510: leyendo y moviendo Dynamixel AX-12 (II)

En este programa utilizaremos un servo AX-12 para mover otro tal cual movamos el primero. Utilizaremos el ejemplo anterior con algunos cambios para incorporar esta nueva función, como habitualmente ocurre cuando se desarrolla software.

La función que realiza este control es void controlPorAX12(int parametroIdAX12Entrada, int parametroIdAX12Salida):

[sourcecode language="c"]
int esperaMientrasSeSitua(int idAX12)
{
int estado=COMM_TXSUCCESS;
boolean enMovimiento=true;

while (enMovimiento==true)
{
enMovimiento = dxl_read_byte(idAX12, P_MOVING);
estado = dxl_get_result();
if (estado!=COMM_RXSUCCESS)
break;
}

return estado;
}

void controlPorAX12(int parametroIdAX12Entrada, int parametroIdAX12Salida)
{
int posicion=512;

dxl_write_word( parametroIdAX12Entrada, P_GOAL_POSITION_L, posicion);
esperaMientrasSeSitua(parametroIdAX12Entrada);
dxl_write_byte (parametroIdAX12Entrada, P_TORQUE_ENABLE, 0); // quitar toque

dxl_write_word( parametroIdAX12Salida, P_GOAL_POSITION_L, posicion);
esperaMientrasSeSitua(parametroIdAX12Salida);

while(posicion>5 && posicion <1000)
{
posicion = dxl_read_word( parametroIdAX12Entrada, P_PRESENT_POSITION_L );
dxl_write_word( parametroIdAX12Salida, P_GOAL_POSITION_L, posicion );
}
printf ("nFin controlPorAX12 idAXEntrada:%i, posicion: %in", parametroIdAX12Entrada, posicion);
}
[/sourcecode]

Pero previamente hemos de entrar por RoboPlus Terminal el ID del servo AX-12 mando y del que queremos mover.

[sourcecode language="c"]
void datosDesdeOtroAX12()
{
int idAX12Entrada=0;
int idAX12Salida=0;

idAX12Entrada=obtenerId("de entrada");
if (idAX12Entrada!=0)
{
idAX12Salida=obtenerId("de salida");
if (idAX12Salida!=0)
{
printf("nFinaliza llevando el AX12 %i de entrada a su posición inicial (0) o final (1023)n", idAX12Entrada);
controlPorAX12(idAX12Entrada, idAX12Salida);
}
}
}
[/sourcecode]

La función principal (main) quedaría así:

[sourcecode language="c"]
int main(void)
{
init();

// ordenesDesdeTerminal(); el ejemplo anterior refactorizado en una función
datosDesdeOtroAX12();

puts("The End");

return 0;
}
[/sourcecode]

Aquí te puedes descargar el ejemplo completo

lunes, 7 de mayo de 2012

Programming CM-510 with C: reading values from terminal and moving a Dynamixel AX-12

Programming CM-510 with C: reading values from terminal and moving a Dynamixel AX-12

In this post we are going to ask the ID AX-12+ that we want to move and the goal position.

The explanations are in the code as comments, I hope that there are enough comments to understand it, let me know if you can't understand it.

The main loop is that easy:

[sourcecode language="c"]
int main(void)
{
init();

while(true) // we'll repeat this looop forever
{
int id=getId(); // get the ID of the AX-12 that we want to move
int position=getPosition(); // get the goal position
dxl_write_word( id, P_GOAL_POSITION_L, position); // sent the command to the Dynamixel
}

return 0;
}
[/sourcecode]

A brief explanation of printf: printf function is much more powerful than it seems at a first sight, it admits many parameters that allow us to display a large amount of data types and formats. In In the following example %i means that in that position the message will include an integer that will be passed as a parameter after the string "AX12 ID:". The control character "n" means a line break.

Each character in the string is stored in a memory location [A][X][1][2][ ][I][D] strings are a special case of array.

getID and getPosition are also very easy, isn't?

[sourcecode language="c"]
/*
The next functions asks for the ID of the AX-12 to move, checking that the ID is a value between 1 and 18
*/

int getId()
{
/*
We define an array enough large, 256 bytes (characters). Probably it's enough with 4 bytes, but if we type more than the defined size we will get an error*/
char buffer[256];

/*
And we define another integer variable, it's very advisable to asign a value in the definition, in this case we assign the minimun value, 1*/
int ax12Id=1;

// puts is very similar to printf, it shows the string that it receives as parameter
puts ("nnMoving a Dynamixel");

do
{ // starting the loop
puts ("Enter the ID of the AX-12 that you wwant to move, between 1 y 18, ");
ax12Id=readInteger(buffer); // this function will read from what we type in the keyboard
//// exclamation (!) is the NOT logical operator. It will repeat the loop while the value is not valid
}while(!isValid(ax12Id, 1, 18));

// Showing the typed value
printf("AX12 ID: %in", ax12Id);

return ax12Id;
}

// Now we will repeat almost the same code that above, it should be pretty easy to write a reusable function, isn't?

int getPosition()
{
char buffer[256];
int position=0;

do
{
puts ("Enter a value between 0 and 1023 as the goal position");
position=readInteger(buffer);
}while(!isValid(position, 0, 1023));

printf("nPosition: %in", position);

return position;
[/sourcecode]

The functions used to read the text from the Terminal are quite interesting, showing the use of a string. It also shows how to use the .h file (declaration) and the .c (definitions, the content of the functions):

[sourcecode language="c"]
// Body (content) of the functions that read data

/*
Recibimos una variable que tiene reservado espacio en memoria para almacenar
la cadena introducida
*/

void readString(char bufferParameter[])
{
int i=0; // We'll use this variable as index of the buffer where we will store data
do
{
bufferParameter[i]=getchar(); // it store the read character in the i position of bufferParameter
putchar(bufferParameter[i]); // showing it
if (bufferParameter[i]=='b') // if Backspace was pressed
i--; // it goes to the previous position, rewritting the previoulsy typed character
else //
i++; // it will write in the next position
}while(bufferParameter[i-1]!='n'); // while the last values is not INTRO. The symmbol ! represents the logical operator NOT

bufferParameter[i]=0; // A NULL (0, zero) is necessary in the last position of any string
}

/*
It read an string, it's converted to integer and returned
*/
int readInteger(char bufferParameter[])
{
readString(bufferParameter);
return atoi(bufferParameter);
}
[/sourcecode]

You can download the sourcecode here

The language C, also C++, has some very interesting features such as the inclusion of code depending on certain conditions. This lets you use the same code for different processors by simply changing one or more parameters.

As an example, this ZIP contains a project for Dev-CPP with a version of the source files for the PC and the CM-510; simply commenting or uncommenting a line in the file "myCM510.h" (for AVR Studio you should create the appropriate project and include the sources files).

Instead of moving AX-12 it displays the text "dxl_write_word" with the parameters received. We can practice C and perform different tests on the PC without connecting any servo.

sábado, 5 de mayo de 2012

Programacion C con CM-510: leyendo y moviendo Dynamixel AX-12 (I)

Programación C con CM-510: leyendo y moviendo Dynamixel AX-12 (I)

Como segunda entrega de este taller de programación de Bioloid vamos a realizar un programa que nos pedirá el identificador (ID) del AX-12+ a mover y la posición en la que lo situaremos.

Las explicaciones las he ido incluyendo en el código como comentarios, espero que los comentarios sean suficientes como para poderlo seguir, ya me diréis si es así.

El bucle principal es así de sencillo:

[sourcecode language="c"]

int main(void)
{
init();

while(true) // repetiremos eternamente este bucle
{
int id=obtenerId(); // obtenemos el ID del AX-12 a utilizar
int posicion=obtenerPosicion(); // obtenemos la posición en la que situar el AX-12 seleccionado
dxl_write_word( id, P_GOAL_POSITION_L, posicion); // enviamos la orden al Dynamixel
}

return 0;
}

[/sourcecode]

Unas breves explicaciones sobre printf: La función printf es mucho más potente de lo que parece a primera vista, admitiendo bastantes parámetros que nos permiten mostrar una gran cantidad de tipos de datos y formatos diferentes. En el siguiente ejemplo %iindica que en dicha posición del mensaje se incluirá un entero que le pasaremos como parámetro a continuación de la cadena "ID del AX12:". El carácter de control "n" indica que incluya un salto de línea.

Cada carácter de la cadena se almacena en un posición de memoria [I][D][ ][d][e][l]... siendo las cadenas un caso especial de vector o, en inglés, "array".

Descárgate aquí una presentación en PDF con explicaciones muy detalladas sobre cadenas en C, de la Universidad del País Vasco.

Las funciones obtenerId() y obtenerPosicion() son también bastante sencillas, ¿verdad?

[sourcecode language="c"]

/*
La siguiente función solicita la entrada de un valor para seleccionar el ID del Dynamixel al que
enviar las órdenes, Comprobando que el que esté entre 1 y 18
*/

int obtenerId()
{
/*
Creamos una variable de un tamaño amplio, 256 bytes (posiciones de un carácter), aunque con 4
valdría, pero si se introdujeran más carácteres de los definidos provocaría un error.
*/
char cadena[256];

/*
Y otra variable de tipo entero, es recomendable asignar siempre un valor, en este caso
la inicializamos con el valor mínimo, 1
*/
int ax12Id=1;

// puts es muy similar a printf, muestra la cadena que recibe como parámetro por la pantalla
puts ("nnVamos a mover un Dynamixel a voluntad. V02");

do
{    // inicio del bucle
puts ("Introduce el ID del servo a mover, entre 1 y 18, ");
ax12Id=leerEnteroComoCadena(cadena); // llamamos a esta función  para entrar por pantalla el valor
//// la admiración (!) es el operador lógico NOT. Repetiremos el bucle mientras el rango NO se valido
}while(!enRangoValido(ax12Id, 1, 18));

// Mostramos el valor introducido
printf("ID del AX12: %in", ax12Id);

return ax12Id;
}

// Repetiremos prácticamente el mismo código que la función anterior, ¿sería fácil crear una función reutilizable para ambos, verdad?
int obtenerPosicion()
{
char cadena[256];
int posicion=0;

do
{
puts ("Introduce un valor entre 0 y 1023 para situarlo en esa posicion");
posicion=leerEnteroComoCadena(cadena);
}while(!enRangoValido(posicion, 0, 1023));

printf("nPosicion: %in", posicion);

return posicion;
}
[/sourcecode]

Las funciones utilizadas para leer el texto de la consola son bastante interesantes,
ya que nos muestran la utilización de una cadena. También nos muestra como utilizar
los fichero .h (declaraciones) y .c (definiciones, el contenido de las funciones):

[sourcecode language="c"]
// Cuerpo (contenido) de las funciones de entrada de datos

/*
Recibimos una variable que tiene reservado espacio en memoria para almacenar
la cadena introducida
*/

void leerCadena(char parametroCadena[])
{
int i=0; // Utilizaremos esta variable como índice para ir almacenando los caracteres introducidos
do
{
parametroCadena[i]=getchar();  // almacenamos el carácter obtenido en la posición i de parametroCadena
putchar(parametroCadena[i]);   // lo mostramos por pantalla
if (parametroCadena[i]=='b')  // si se ha pulsado la tecla <Borrar> (justo encima de <Intro>)
i--;                       //    nos situamos en la posición anterior para escribir de nuevo sobre ella
else                           // si no
i++;                       //    escribiremos en la siguiente posición
}while(parametroCadena[i-1]!='n'); // mientras el último valor guardado NO sea INTRO. El símbolo ! representa el operador NOT
parametroCadena[i]=0;           // en la última posición de una cadena ha de estar el valor cero (NULO, null en Inglés)
}

/*
Leemos una cadena, la convertimos a entero y devolvemos el valor obtenido
*/
int leerEnteroComoCadena(char parametroCadena[])
{
leerCadena(parametroCadena);
return atoi(parametroCadena);
}
[/sourcecode]

El código fuente entero os lo podéis descargar desde aquí.

El lenguaje C, también C++, tiene algunas características muy interesantes, como la inclusión de código dependiendo de determinadas condiciones. Esto permite utilizar el mismo código fuente para distintos procesadores, simplemente cambiando uno o varios parámetros.

A modo de ejemplo este ZIP contiene un proyecto preparado para Dev-CPP con una versión de los ficheros fuente válida para PC y para CM-510; simplemente comentando o descomentando una línea del fichero "myCM510.h" (para utilizarlo con AVR Studio se ha de crear el correspondiente proyecto e incluir estos fuentes).

En lugar de mover el servo AX-12 muestra en pantalla el texto "dxl_write_word" con los parámetros recibidos. Podemos practicar C y realizar distintas pruebas en el PC sin conectar ningún servo.

[sourcecode language="c"]

// Si no está comentada la siguiente línea podremos compilar el programa para PC
// Si está comentada la siguiente línea podremos compilar el programa para CM-510
#define __PC_TEST_

[/sourcecode]

martes, 1 de mayo de 2012

Bioloid CM-510 programming tutorial: First steps with C

Bioloid programming workshop: First steps with C

(En español)

This brief post starts the Bioloid programming workshop, using ​C, C + + and C# languages  and different controllers: ATMega (CM-510), PC, SBC.

The first steps in C programming

C language is a simple, powerful and extremely versatile tool used to develop software for industries as diverse as the automobile , medical equipment or for the software industry itself, from Microsoft Office to operating systems like Windows or Linux.

This will be a very practical programming workshop with Robotis Dynamixel servos, so I will include links tutorials anb books that include broader and deeper explanations, like C introduction (pdf). But there are a lot:

C Language Tutorial (html)
How C Programming Works (html)
Several C programming tutorials (html)

One of the simplest programs in C:

[sourcecode language="c"]
// This line that begins with two slashes is a comment

/*
These others, starting with a slash and an asterisk
are a comment too, ending with another asterisk and a slash.

The comments are very useful for explaining what we do and,
especially, why we do so, because after a few months we will not remember the details.
*/

/*
The includes are useful to announce the compiler that we will use
existing functions from other files, such as stdio.h, in this example,  to get
the printf function to display information on screen.
(This is not exactly true, but more on that later)
*/
#include

/*
This is one way to start a C program,
Creating the main function as the starting point of every C program:
*/
void main ()

// The body or content of the function starts with the following curly bracket
{

// Guess what does the following function?
printf ("Hello, World");

// And, predictably, the function ends with the closing curly bracket
}
[/sourcecode]

Now we will write the first program for the CM-510

But previously you should install the software needed to program the CM-510. If you install WinAVR in "C:tools WinAVR-20100110" you can download a zip with everything ready to use.

After loading our program in the CM-510, to use RoboPlus Tasks, Motion RoboPlus Robotis and other programs, we will have to restore Robotis firmware.

[sourcecode language="c"]
# Include stdio.h
# Include "myCM510.h"

executeMovement1 void (int ax12Id)
{
dxl_write_word (ax12Id, P_GOAL_POSITION_L, 512);
}

executeMovement2 void (int ax12Id)
{
dxl_write_word (ax12Id, P_GOAL_POSITION_L, 600);
}

int main (void)
{
ax12Id int = 6;

init ();

printf ("\r \n A simple example");

printf ("\r \n Perform movement 1 with the AX-12% i", ax12Id);
executeMovement1 (ax12Id);

printf ("\r \n Pause half a second");
_delay_ms (500); // half-second pause

printf ("\r \n Beep!");
buzzOn (100); // beep

printf ("\r \n Pause for a second");
_delay_ms (1000); // pause for 1 second

printf ("\r \n Perform movement 2 with the AX-12% i", ax12Id);
executeMovement2 (ax12Id);

printf ("\r \n End");
}
[/sourcecode]

The characters "\r \n" are used to jump to the next line in Windows.

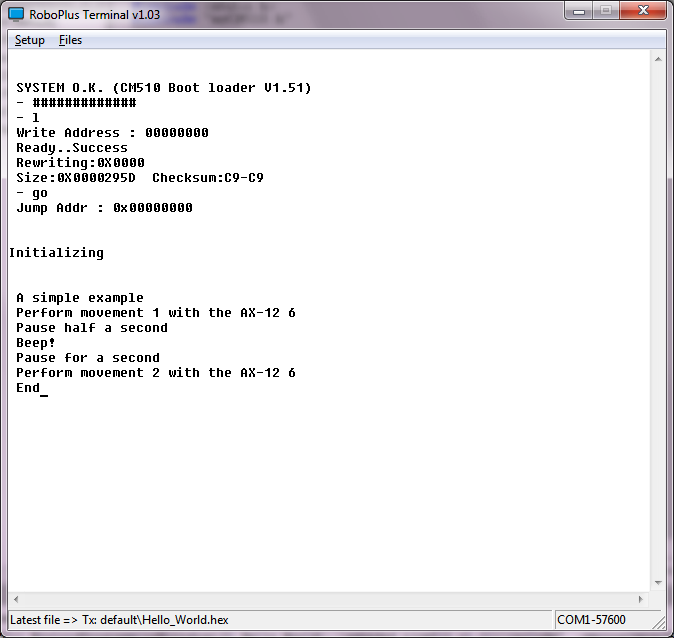
If you have installed the necessary software (WinAVR must be installed in "C:tools WinAVR-20100110") and unzip this zip file in the root directory (C: ) you have to be ready to modify, compile, or simply load the executable "hello_world.hex" in the CM-510. You will see something similar to:

[caption id="attachment_584" align="aligncenter" width="300"]01_Hello_World_CM-510 01_Hello_World_CM-510[/caption]

Some explanations
dxl_write_word (ax12Id, P_GOAL_POSITION_L, 600);

This function is included in the Robotis CM-510 libraries allowing us to send commands to a Dynamixel actuator very easily. We only have to indicate the ID of the AX-12 to move (ax12Id), the code of the order that the AX-12 should execute, in this case go to the goal position (P_GOAL_POSITION_L), and the position in which has to be placed between 0 and 1024 (600 in the example).

dx_series_goal


Highlights:

Decompose the program into different parts

  •     Having previously created the init () function in myCM510.h/myCM510.c allows us to include it easily in this program.

  •     In addition to simplifying programming we can reuse the same code in different programs. This saves us from having to repeat the same code many times and, especially, have to correct faults or improve in only one point, . Later we will see how to organize directories and even how to create libraries.

  •     It also allows us to encapsulate the details, so that when the program starts growing we can handle them easily without being overwhelmed.


Showing what is doing running the program


Using the printf function we can send text to the screen that lets us know what is doing the program (printf sends to the serial port, "RoboPlus Terminal" read it  and displays it on the screen. We will lear how to read from the serial port when we start programming Bioloid using a PC or SBC)

Can you think of an easy way to avoid having two similar functions such as "void executeMovement1 (int ax12Id)" and "void executeMovement2 (int ax12Id)"?