Mostrando entradas con la etiqueta Dynamixel. Mostrar todas las entradas

miércoles, 20 de noviembre de 2013

(I) Reading sensors connected to Robotis CM-510

cm-510 sensorsUsing the Dynamixel SDK instead of RoboPlus Tasks is not possible to query sensors connected to the CM-5xx controller. But, of course, using standard programming languages, like C++, and tools, line QT Creator or Eclipse, with its full featured IDEs and debuggers is a hugue gain.

So I created a firmware for the CM-510 which can be queried and receive commands to itself, including its sensors, or to Dynamyxel devices.

The idea is very simple:

This program running in the CM-510 receives:

- commands or queries to IDs of Dynamixel devices. These are not processed, only redirected to the Dynamixel bus only if it was received by serial port ( serial cable or zigbee). If it was received from the Dynamixel bus nothing is done.

- commands or queries to the CM-510 ID (I chose ID=200), like beep, or to the sensors connected to it. This commands and queries are processed in the CM-510, basically querying the sensors.

In both cases the answer is sent to the connection from which the query or command was received.

After power on the CM-510, you can select the mode with the 4 cursor keys as showed in a terminal connected to its serial port:

"For 'Toss mode' press (Up), for 'Device mode' (Down), for 'Device debug mode' (Left),to start press (Right)"

In the Device mode:

all the receptions and sends are through the Dynamixel bus, the CM-510 is simply another device.

In the Toss mode:

- what is received from the serial connection is sent to the Dynamixel bus or processed in the CM-510 (If sent to its ID)

-what is received from the Dynamixel bus is sent to the serial connection

Finally, the Debug mode:

is like the Device mode, but all the debug messages included in the CM-510 are sent to the serial connection.

A complete sequence with code snippets from the CM-510 program and from the code running in the other computer:

Some C++ code snippets from this example: (C# in the next post)


[sourcecode language="cpp"]
enum AX12Address //and functions implemented in the CM-510 program, like
{
ReadCM510SensorRaw = 1,
Beep = 8,
ReadCM510SensorFiltered = 4,
SetSensorValuesToFilter = 5,
...
}
[/sourcecode]

[sourcecode language="cpp"]
void doBeep()
{
cout << "Beep" << endl;
mySystem.dynamixelCommunication.sendOrder(100, AXS1_Buzzer, (byte) DO, (short) 500);
usleep (200000);
mySystem.dynamixelCommunication.sendOrder(200,MyCommunications::Beep short)5);
}
[/sourcecode]

Querying sensor:

[sourcecode language="cpp"]
void doQuerySensor()
{
int sensorPort=getSensorPort();
int value=mySystem.dynamixelCommunication.readSensorValue (200,ReadCM510SensorRaw, sensorPort);
cout << "the sensor reads: [" << value << "] " << endl << endl << endl;
}
[/sourcecode]

These command and query are processed in the CM-510:

Getting the sensor value:

[sourcecode language="c"]

int executeCM510Function()
{
...
case F_GET_SENSOR_VALUE_RAW:
values[1] = getSensorValueRaw(parameters[1]);
break;

case F_GET_SENSOR_VALUE_FILTERED:
values[1] = getSensorValueFiltered(parameters[1], sensorValuesToFilterDefined);
break;

case F_GET_TWO_DMS_SENSOR_VALUES:
parametersReceived=3;
getTwoDMSSensorsValues();
break;

case F_GET_MULTIPLE_SENSOR_VALUE:
getMultipleSensorsValues();
break;

case F_DO_SENSOR_SCAN:
values[1]= sensorScan(parameters[1]);
break;

case F_SET_VALUE_DMS1 : //set default value DMS1
DMS1=parameters[1];
break;

case F_SET_VALUE_DMS2 : //set default value DMS1
DMS2=parameters[1];
break;

case F_BEEP:
if (debugMode)
printf("executeCM510Function beep\n");
beep();
break;

case F_SET_SENSOR_VALUES_TO_FILTER:
sensorValuesToFilterDefined=parameters[1];
break;
}

return function;
}

}
...
int getSensorValueRaw(unsigned char portId)
{
ADCSRA = (1 << ADEN) | (1 << ADPS2) | (1 << ADPS1);

setPort(portId);
//PORTA &= ~0x80;
//PORTA &= ~0x20;

//_delay_us(12); // Short Delay for rising sensor signal
_delay_us(24);
ADCSRA |= (1 << ADIF); // AD-Conversion Interrupt Flag Clear
ADCSRA |= (1 << ADSC); // AD-Conversion Start

while( !(ADCSRA & (1 << ADIF)) ); // Wait until AD-Conversion complete

PORTA = 0xFC; // IR-LED Off

//printf( "%d\r\n", ADC); // Print Value on USART

//_delay_ms(50);
_delay_ms(ReadSensorDelayMS);

return ADC;
}

[/sourcecode]


[sourcecode language="c"]

void beep()
{
buzzOn(100);
buzzOff();
}
[/sourcecode]

But we can do a little more with the CM-510 processor, we can do some filtering to the sensor values.

The readings from the DMS are usually somewhat erratic, so we can simply:

- discard the minimum and maximum values:

- if we take 5 more than measures, then return the average if the are more than 3, if 3 or less it

Previously we should set how many readings should be done, if not, the default number of readings are 5:

[sourcecode language="c"]
int getSensorValueFiltered(unsigned char portId, int times)
{
...
switch(function)
{
case F_GET_SENSOR_VALUE_RAW:
values[1] = getSensorValueRaw(parameters[1]);
break;

case F_GET_SENSOR_VALUE_FILTERED:
values[1] = getSensorValueFiltered(parameters[1], sensorValuesToFilterDefined);
break;

case F_GET_TWO_DMS_SENSOR_VALUES:
parametersReceived=3;
getTwoDMSSensorsValues();
break;

case F_GET_MULTIPLE_SENSOR_VALUE:
getMultipleSensorsValues();
break;

case F_DO_SENSOR_SCAN:
values[1]= sensorScan(parameters[1]);
break;

case F_SET_VALUE_DMS1 : //set default value DMS1
DMS1=parameters[1];
break;

case F_SET_VALUE_DMS2 : //set default value DMS1
DMS2=parameters[1];
break;

case F_BEEP:
if (debugMode)
printf("executeCM510Function beep\n");
beep();
break;

case F_SET_SENSOR_VALUES_TO_FILTER:
sensorValuesToFilterDefined=parameters[1];
break;
}
...
[/sourcecode]

We also can take values from multiple sensors with one query, but It will be explained in the next post...

domingo, 16 de junio de 2013

Robotis CM-900 in Toss Mode and querying connected sensors

CM-900 is a very cheap and tiny Robotis Dynamixel controller based in the STM32 ARM 32 bits microcontroller. Here you can find several links to documents.

CM-900_Size

I think it's ideal as a controller managed with, for example, a Raspberry Pi or a Pandaboard, so I have created a program which can be managed externally to control Dynamixel items (AX-12, AX-S1), Toss Mode, and sensors connected to the CM-900 with a simple protocol similar but simpler than the Dynamixel protocol:

[Headers] [ID] [Command code] [Nº Params] [Param1] [Param2] [ParamN]

Toss Mode works like USB2Dynamixel, but with this program in addition you can get sensor vales.

Toss Mode was a software feature, at least since CM-5, which allows you to use the elements connected to the controller from another device, usually a more powerful computer. What it receives from the USB or serial is sent to the Dynamixel bus, and whatever it receives from Dynamyxel bus is sent to the serial or USB connection.

Example for blinking twice: { 0xFF, 0xFF, 90, 1, 1, 2 }

Headers: 0xFF 0xFF

ID: 90

Command code: 1

Number of parameters: 1

Parameter 1: 2

Example for reading ultrasonic sensor (HC-SR04) : { 0xFF, 0xFF, 90, 2, 0 }

[sourcecode language="CPP"]

void MainWindow::testCM900_Sensor_US()
{
const int size=5;
byte buffer2[size] = { 0xFF, 0xFF, 90, 2, 0 };
pDynComm->rawWrite(buffer2, size);
}
[/sourcecode]

[caption id="attachment_1753" align="alignleft" width="320"]Ultrasonic sensor hc-sr04 Ultrasonic sensor hc-sr04[/caption]

And here the file with the code for Robotis CM-9 IDE version 0.9.9. You also need to copy Prof. Mason library for ultrasonic sensor to CM 900 IDE libraries folder. Althought it i still a beta version, I think it works ok. Asigning true to these variables, the messages for debugging are sent either to USB connection o Serial2 (connecting Zigbee is the easy option):

[sourcecode language="CPP"]
bool debugOutputSerial2On=true;
bool debugOutputOn=false;
[/sourcecode]

miércoles, 12 de junio de 2013

Robotis CM-900 as a tosser for Dynamixel commands

CM-900 is really tiny and cheap, so is perfect to use as communication bridge between any computer (Raspberry Pi, Pandaboard, etc. included, of course) and the Dynamixel bus. Whatever it receives from the Serial USB (usually commands and queries) is sent to the Dynamixel bus, and what it receives from the Dynamixel bus is sent to the SerialUSB (usually answers)

Here is the source code of the little program for CM-900 IDE:

[sourcecode language="C"]
int counter;
bool onlyOnceHappened;

void blinkOnce()
{
digitalWrite(BOARD_LED_PIN, LOW);
delay_us(100);
digitalWrite(BOARD_LED_PIN, HIGH);
}

void setup()
{
pinMode(BOARD_LED_PIN, OUTPUT);

onlyOnceHappened=false;
counter=0;

//USB Serial initialize
SerialUSB.begin();
// SerialUSB.attachInterrupt(USBDataReceived);
//DXL initialize
Dxl.begin(1);
}

byte aByte=0;
uint8 aUint8;

void loop()
{
// SerialUSB.println (counter++);

if (onlyOnceHappened==false)
{
blinkOnce();
onlyOnceHappened=true;
delay (3000); //Some time to the user to activate the monitor/console
SerialUSB.println ("v1.1.1 Orders receiver started");
}

if (SerialUSB.available())
{
aUint8=SerialUSB.read();
blinkOnce();
Dxl.writeRaw(aUint8);
// delay(20);
}

if (Dxl.available())
{
aByte=Dxl.readRaw();
blinkOnce();
SerialUSB.write(aByte);
// delay(20);
}
}

[/sourcecode]

Here the file.

In the next post I will include an improved version that could read sensors connected to the CM-900, "expanding" the Dynamixel protocol.

lunes, 25 de marzo de 2013

So... let's the Bioloid, C++ and QT games start!

To cretate this workshop I'm using Ubuntu 12.04, GNU g++ (Ubuntu/Linaro 4.6.3-1ubuntu5) 4.6.3 (see Synaptic installer capture),

[caption id="attachment_1635" align="aligncenter" width="300"]Synaptic G++ Synaptic G++[/caption]

QT 5.0.1 and QT creator 2.6.2,

QT creator is a very easy, and good, free IDE with a great design tool for creating user interfaces:

Be careful with this bug: Qt Creator 2.0: UI layout is not updated before launching the application http://qt-project.org/forums/viewthread/292 Is very annoying and time consuming, the solution is in the last comment (setting the UI_DIR in the .pro file)

[caption id="attachment_1637" align="aligncenter" width="600"]QTCreator Bioloid QTWorkshop QTCreator Bioloid QTWorkshop[/caption]

I also will use it with Windows 7.

I also use Boost to get some C++11 features for threading. For example:

pWorkThread = new thread(&Activity::doWork, this, parameter);

std::lock_guard < std::mutex > guard(myMutex);

Don't bother if you don't understand it right now, it's in the guts of the AXControl_v2 library we will use it in a very easy way, as you will see below. Here you will find a lot of resources to learn basic and advanced C++

Example context fot std::lock_guard < std::mutex > guard(myMutex);

[sourcecode language="cpp"]

short DynamixelCommunication::readSensorValue(int id, AX12Address address,
int port) {
std::lock_guard < std::mutex > guard(myMutex);
short value = -1;
try {
int size = getReadSensorWordCommand(buffer, (byte) (id), address,
(byte) (port));
memset(&result, 0, MaxBufferSize);
serialPort.query(buffer, result, size, WaitTimeReadSensor);
value = getQueryResult(result, size);
if (value <= 0)
Debug::show("DynamixelCommunication.readSensorValue", value);

} catch (exception e) {
Debug::show("DynamixelCommunication.readSensorValue", e.what());
}
return value;
}

[/sourcecode]

And context for pWorkThread = new thread(&Activity::doWork, this, parameter);:

[sourcecode language="cpp"]

class Activity {
private:

protected:
std::thread *pWorkThread;

...

}

void Activity::start(int parameter) {
working = true;
pWorkThread = new thread(&Activity::doWork, this, parameter);
Util::sleepMS(10);
}
Let's see how to open the connection
[/sourcecode]

Let's see how to open the connection to the CM-510:

[sourcecode language="cpp"]
void MainWindow::on_B_Open_clicked()
{
//QString output="Open it";
//QMessageBox::information(this, "Output", output, QMessageBox::Ok);

//dynComm.open("/dev/ttyUSB0",57600); //open with these parameters
if (pDynComm->open()) //open getting the parameter from the configuration fiel
{
//Connection opened
setConnectionButtons(true); //User interface update
updateAX12Parameters(ui->SB_AX12_1_ID->text().toInt()); //User interface update
}
else
{
//Show problem opening the connection
string cantOpenPortName="I can't open port: ";
cantOpenPortName+=pConf->getStringValue(DynamixelCommunication::ParameterSerialPortName);

QMessageBox::information(this, "Error", QString::fromStdString(cantOpenPortName), QMessageBox::Ok);
}
}
[/sourcecode]

and get a beep from the Robotis CM-510 (using this alternative firmware):

[sourcecode language="cpp"]
pDynComm->sendOrder(200, MyCommunications::BeepCM510, 0); //200 is the Dynamixel device ID used for the CM-510, 0 because beep doesn't need any additional value
[/sourcecode]

Getting the AX12 position and showing it:

[sourcecode language="cpp"]
void MainWindow::on_B_AX12_1_GET_POS_clicked()
{
QString qStr;

int id = getAX12_1_Id();

int position = pDynComm->readValue(id, MyCommunications::PresentPosition);

ui->SB_AX12_1_POS->setValue(position);
[/sourcecode]

Setting the AX12 position:

[sourcecode language="cpp"]
void MainWindow::on_B_AX12_1_SET_POS_clicked()
{
int id = getAX12_1_Id();

int position= ui->SB_AX12_1_POS->text().toInt();
pDynComm->sendOrder(id, MyCommunications::GoalPosition,position);
}
[/sourcecode]

Putting the selected AX12 LED on and off

[sourcecode language="cpp"]
void MainWindow::on_CH_AX12_1_LED_clicked(bool checked)
{
int id = getAX12_1_Id();

pDynComm->sendOrder(id, MyCommunications::LED, (checked?1:0));// if checked 1, else 0
}
[/sourcecode]

And an auxiliary UI method to get the id from the selected AX-12

[sourcecode language="cpp"]
{
int MainWindow::getAX12_1_Id()
{
QString qStr=ui->SB_AX12_1_ID->text();
int id=Util::convertToInt(qStr.toStdString());

return id;
}
[/sourcecode]

You can download sources and Linux binaries here

A diagram with all the AXControl_v2 lib classes and their methods:

[caption id="attachment_1384" align="aligncenter" width="600"]c++ signatura c++ signatura[/caption]

[Update]

[caption id="attachment_1722" align="aligncenter" width="164"]QT5 Bioloid Workbench QT5 Bioloid Workbench[/caption]

domingo, 17 de marzo de 2013

C++, Bioloid and Raspberry Pi (v0.2)

[V.02 updates: AX C++ architecture, core classes diagram and HexaWheels scanning video]

Why C++, Bioloid and Raspberry Pi?


[caption id="attachment_1254" align="alignleft" width="150"]C++ Stroustrup's book C++ Stroustrup's book[/caption]

C++, specially with the great improvements of the last C++11 standard, joins together a great efficiency in performance and a low memory footprint with advanced high level language features, making C++ a great tool for embedding, robotics, programming.

If you want to know how to use C++ very efficiently these two guides will help you:

- The JSF air vehicle C++ coding standards ( F-35 fighter aircraft)

- ISO C++ committee's report on performance

.

.


[caption id="attachment_1221" align="alignleft" width="300"]Bioloid Premium Bioloid Premium[/caption]

Bioloid Premium is a wonderful kit for creating legged and wheeled robots, including (here full parts list):

- 18 powerful and versatile AX-12 servos

- an ATMega 2561 (CM-510) or, recently, an ARM STM32F103RE 32bits (CM-530), based controller. Also you can control the AX-12 with the USB2Dynamixel straight from your USB with a FTDI driver.

- And a lot of parts to create the structure of the robot

.

[caption id="attachment_1257" align="alignleft" width="216"]RaspberryPi RaspberryPi[/caption]

Raspberry Pi is the cheaper and more brilliant conceived SBC (more specifications here):

- Broadcom BCM2835 SoC full HD multimedia applications processor

- 700 MHz Low Power ARM1176JZ-F Applications Processor

- Dual Core VideoCore IV® Multimedia Co-Processor

- 256/512 MB SDRAM

One simple example:
[youtube http://www.youtube.com/watch?v=Yhv43H5Omfc&w=480&h=360]

Learning C++


Starting:

C++ is a very powerful but complex programming language, so I think that the better approach is to start step by step, from the most easy features (yes, C++ could be used in an easy way) to the most advanced features it offers. What is C++? I will quote (I try to not explain anything that already is explained), Stroustrup, "his father", from his book The C++ programming language 3th Edition:
"C++ is a general-purpose programming language with a bias towards systems programming that
– is a better C,
– supports data abstraction,
– supports object-oriented programming, and
– supports generic programming."

And wikipedia:
C++ (pronounced "see plus plus") is a statically typed, free-form, multi-paradigm, compiled, general-purpose programming language. It is regarded as an intermediate-level language, as it comprises a combination of both high-level and low-level language features.[3] Developed by Bjarne Stroustrup starting in 1979 at Bell Labs, it adds object oriented features, such as classes, and other enhancements to the C programming language.

Web resources:

If you want more C++ links, these found at JUCE will help you.


[caption id="attachment_1385" align="alignright" width="140"]Programming -- Principles and Practice Using C++Programming -- Principles and Practice Using C++ Programming -- Principles and Practice Using C++[/caption]

Free books and documents:


- Maintain stability and compatibility with C++98 and possibly with C;
- Improve C++ to facilitate systems and library design, rather than to introduce new features useful only to specific applications;
- Increase type safety by providing safer alternatives to earlier unsafe techniques;
- Increase performance and the ability to work directly with hardware


Books:

Advancing:

In robotics, and embedded programming in general, we will need some advanced knowledge and practices to reach our goals.

Free books and documents:


  • Concurrent programming, threading Our robots we will need to do several actions simultaneously, like perceiving the world with several sensors, moving and deciding what to do to reach is objectives.


  • Communications, the serial port communications functions are used for wireless and wired connections, and we will need to communicate between controllers and with sensors and servos.


Books:

C++ robotics programming


Well, this is really the goal, robotics programming.

As this is a workshop it will follow the creation of the the walker and vehicle Hexapod showed above in the video. This is currently the core architecture and the HexaWheels module (namespace classes):

[caption id="attachment_1391" align="aligncenter" width="300"]AX C++ architecture v2 AX C++ architecture v2[/caption]

And these are the core classes:

todo_signatura

The workshop will include:

- Basics

Like communications with serial port and wireless, using Dynamixels, sensors, ... Language features for robotics, like asynchronous communications and threads and... delays!.

- Intermediate

Combination of basics features using sensors (like scanning) and servos (walking motions). For example, scanning with a DMS sensor:

As a simple example:

[youtube http://www.youtube.com/watch?v=UHKaYuaZi4A&w=480&h=360]

- Advanced

Advanced perception and behaviours

I think this could very funny, using an advanced sensor like Asus Xtion, to detect certain objects to interact, and create configurable and amusing behaviours.

CM-510 mirocontroller programming

- Tools:

PC, Raspberry Pi and Pandaboard, installation and configuration, tool and projects

- GNU C++, Boost
- Eclipse
- QT 5

The contents will come soon, very soon...

miércoles, 13 de marzo de 2013

Playing With Qt 5, C++ and Bioloid

I have been searching the best UI (libraries and UI creating tools) multiplatform framework for several years, and QT 5 is the best option I have found. Its libraries are easy to use, specially the slots (UI widgets connection to code) of QT5.  QT Creator is pretty easy to use and the UI designer is the free best tool I have tested. Really I'm learning to use it as creating these examples.

A very simple example:

[caption id="attachment_1508" align="aligncenter" width="287"]QT Bioloid Workshop QT Bioloid Workshop[/caption]

The code uses two classes from the AXControl_v2 library:

- Configuration, it loads the  parameters from the file HexaWheels.conf (currently in spanish):
Tiempo_Espera_ms=36 // wait time
Tiempo_Espera_Sensores_ms=60 // wait time for sensors
Nombre_Puerto_Serie=/dev/ttyUSB0 // serial port name
Baudios_Puerto_Serie=57600 // baud rate

- DynamixelCommunication, it offers the commands to control Dynamixel items

Connecting to the Dynamixel bus:

[sourcecode language="cpp"]
void MainWindow::on_B_Open_clicked()
{
pDynComm->open(); // open the connection using the parameters from the configuration file
setConnectionButtons(true); // enable and disable conveniently the buttons
}
[/sourcecode]

Getting and setting the AX12 Dynamixel position:

[sourcecode language="cpp"]
void MainWindow::on_B_AX12_1_GET_POS_clicked()
{
QString qStr;

int id=ui->SB_AX12_1_ID->text().toInt();
int position = pDynComm->readValue(id, MyCommunications::PresentPosition);
string str=std::to_string(position);

ui->E_AX12_1_POS->setText(qStr.fromStdString(str));
}

void MainWindow::on_B_AX12_1_SET_POS_clicked()
{
QString qStr=ui->SB_AX12_1_ID->text();
int id=Util::convertToInt(qStr.toStdString());

int position= ui->E_AX12_1_POS->text().toInt();
pDynComm->sendOrder(id, MyCommunications::GoalPosition,position);
}

[/sourcecode]

And this is the (unfinished) main window code:

[sourcecode language="cpp"]
#include

#include "mainwindow.h"
#include "ui_mainwindow.h"

#include "Configuration.h"
#include "DynamixelCommunication.h"
#include "Util.h"

MainWindow::MainWindow(QWidget *parent) :
QMainWindow(parent),
ui(new Ui::MainWindow)
{
ui->setupUi(this);
pConf=new Configuration ("/home/jose/proyectos_svn_win/trunk/bioloid/Comun/CPP/AXControl_v2/src/HexaWheels.conf");
pDynComm=new DynamixelCommunication (pConf);
}

MainWindow::~MainWindow()
{
delete ui;

pDynComm->close();
delete pDynComm;
delete pConf;
}

void MainWindow::setConnectionButtons(bool onOff)
{
ui->B_Open->setEnabled(!onOff);
ui->B_Beep->setEnabled(onOff);
ui->B_Close->setEnabled(onOff);
}

void MainWindow::on_B_Open_clicked()
{
//QString output="Open it";
//QMessageBox::information(this, "Output", output, QMessageBox::Ok);

//dynComm.open("/dev/ttyUSB0",57600);
pDynComm->open();

setConnectionButtons(true);
}

void MainWindow::on_B_Beep_clicked()
{
pDynComm->sendOrder(200, MyCommunications::BeepCM510, 5);
}

void MainWindow::on_B_Close_clicked()
{
pDynComm->close();
setConnectionButtons(false);
QString output="Port closed!";
QMessageBox::information(this, "Output", output, QMessageBox::Ok);

}

void MainWindow::on_B_AX12_1_GET_POS_clicked()
{
QString qStr;

int id=ui->SB_AX12_1_ID->text().toInt();
int position = pDynComm->readValue(id, MyCommunications::PresentPosition);
string str=std::to_string(position);

ui->E_AX12_1_POS->setText(qStr.fromStdString(str));
}

void MainWindow::on_B_AX12_1_SET_POS_clicked()
{
QString qStr=ui->SB_AX12_1_ID->text();
int id=Util::convertToInt(qStr.toStdString());

int position= ui->E_AX12_1_POS->text().toInt();
pDynComm->sendOrder(id, MyCommunications::GoalPosition,position);
}

[/sourcecode]

But it's "growing":

[caption id="attachment_1546" align="aligncenter" width="285"]QT_Workbench QT_Workbench[/caption]

I have uploaded the source and binary of this work in progress to
https://www.box.com/s/mdsdeoem0gg4o2rapipj/s/mdsdeoem0gg4o2rapipj

viernes, 1 de marzo de 2013

Workshop: USB, serial and remote communications with C#

[Previous post: Workshop: Dynamixel communications with C#]

[caption id="attachment_1117" align="alignright" width="150"]Bioloid SerialPort2Dynamixel C# Bioloid SerialPort2Dynamixel C#[/caption]

SerialPort2Dynamixel


Encapsulating  the SerialPort .Net class offers an easy way to use the serial port and receive Dynamixel Zig messages with the Dynamixel protocol.

.

.

Collaborator classes:


[caption id="attachment_1134" align="alignright" width="150"]Bioloid SerialPort2Dynamixel C# Collaborators Bioloid SerialPort2Dynamixel C# Collaborators[/caption]

- The SerialPort .Net class.

- RCDataReader class, which unpack the Dynamixel Zigbee sequence offering the clean data received.

Operations:


The public interface that others classes will use offers principally these operations:

public void setRemoteControlMode(bool on), which sets on or off the reception of data

[sourcecode language="csharp"]

public void setRemoteControlMode(bool on)
{
if (on)
setReceiveDataMethod(rdDataReader.rawRemoteDataReceived);
else
setReceiveDataMethod(null);
}

[/sourcecode]

public void setReceiveDataMethod(remoteControlDataReceived rcDataReceived), that sets the method that will be called when serial port data is received.

And some basics serial port data operations:

[caption id="attachment_1112" align="alignright" width="131"]Raspberry Pi - USB2Dynamixel - CM510 Raspberry Pi - USB2Dynamixel - CM510[/caption]

public bool open(String com, int speed), to open the serial port which name is in the com parameter. Wireless communications and USB ports, as used by Zig or USB2Dynaniel, are also serial ports  (COM1, COM2, ... or /ttyUSB0, ttyUSB1).

public void close(), it will do nothing if the port is already closed.

public byte[] query(byte[] buffer, int pos, int wait), send (write) a query and gets (read) the result.

public void rawWrite(byte[] buffer, int pos), well... it will write whatever contains the buffer in the first pos positions

public byte[] rawRead() , read and returns the data received.

Notes:


To avoid concurrency problems all the operations that use the Dynamixel bus are protected with a Mutex object that avoids that two or more concurrent objects use SerialPort2Dynamixel simultaneously entering the same operation or using the same resources, like variables, objects or the Dynamixel bus.

[caption id="attachment_1620" align="aligncenter" width="300"]Xevel USB2AX Xevel USB2AX[/caption]

[caption id="attachment_1622" align="aligncenter" width="300"]USB2AX over USB2DYNAMIXEL USB2AX over USB2DYNAMIXEL[/caption]


RCDataReader


[caption id="attachment_1155" align="alignright" width="150"]Bioloid RCDataReader C# Bioloid RCDataReader C#[/caption]

[caption id="attachment_1128" align="alignleft" width="112"]Remote communications RemoteCommunications[/caption]

Its responsability is to receive the Dynamixel Zig packets and extract the data.

Collaborator class:


- The ZigSequence enum, with the Dynamixels protocols data sections

[caption id="attachment_1171" align="aligncenter" width="300"]RC-100 packet RC-100 packet[/caption]

Operations:


[caption id="attachment_1146" align="alignleft" width="105"]Robotis RC-100 remote controller values Robotis RC-100 remote controller values[/caption]

public void rawRemoteDataReceived(byte[] rcData), receives the Zigbee data.

public int getValue(), returns the last value received

miércoles, 27 de febrero de 2013

Workshop: Dynamixel communications with C#

[Next post: Workshop: USB, serial and remote communications with C#]

As I wrote in the previous post, I am not using Robotis Dynamixel SDK USB2Dynamixelbecause it only works with the  USB2Dynamixel, and I need that it also should work with the serial port and with zigbee or bluetooth (really all 4 use the serial connection). Also I want to query sensors connected to the CM-510.

[caption id="attachment_1053" align="alignright" width="150"]Zigbee device Zigbee[/caption]

Using the CM-510 and computer serial port (or USB to serial) connection you are free to use any wired or wireless device. Really there are a lot of possibilities.

We will start connecting to the Dynamixel bus and sending commands and queries. These classes do the work:

- DynamixelCommunication

- SerialPort2Dynamixel

- RCDataReader

But there are other classes that offer to them some additional services, like Configuration, Utils, Hex and several enumeration types.

I will use the Class-Responsability-Collaboration template to present the classes.

DynamixelCommunicationBioloid DynamixelCommunication class C#


The main responsibility of this class is sending commands and queries to any Dynamixel device, including the sensors, sound and other capabilities of the CM-510 controller.

Collaborator classes:


SerialPort2Dynamixel,  that offers operations to use the serial port encapsulating .Net SerialPort class

- Three enums for easy use and avoid errors, using an specific type is safer that using simple integers.

    public enum AXS1_IRSensor { Left, Center, Right, None };
    public enum AXS1_SoundNote { LA, LA_, SI, DO, DO_, RE }; //Only the first six 
    public enum DynamixelFunction, with all the Dynamixel protocols codes and some that I added for the CM-510.

- Configuration class, that reads a file where are stored basic configuration parameters. like:

        private static string ParameterSerialPortName
        private static string ParameterSerialPortBaudRate
        private static string ParameterWaitTime_ms
        private static string ParameterWaitTimeForSensors_ms

Bioloid communications C#


Operations:


The public operations are the interface that other classes will use, like:

- short readValue(int id, DynamixelFunction address), reads the value of any AX-12 parameter (or other Dynamixels)


- bool sendOrder(int id, DynamixelFunction address, int value), send commands, like position, speed or torque.


And the private that do internal work supporting the public interface, like:

static int getReadWordCommand(byte[] buffer, byte id, DynamixelFunction address), create the Dynamixel hexadecimal sequence (FF FF 0F 05 03 1E CB 01 FE)


- static short getQueryResult(byte[] res), once the query or command is sent it gets the result.


Let's see readValue and two other called functions:

[sourcecode language="csharp"]

public short readValue(int id, DynamixelFunction address)
{
mutex.WaitOne();
short position = -1;

try
{
int size = getReadWordCommand(buffer, (byte)id, address);
byte[] res = serialPort.query(buffer, size, WaitTimeReadSensor);

position = getQueryResult(res);
if (position < 0)
Debug.show("DynamixelCommunication.readValue", position);

}
catch (Exception e)
{
Debug.show("DynamixelCommunication.readValue", e.Message);
}

mutex.ReleaseMutex();

return position;
}

private static int getReadWordCommand(byte[] buffer, byte id, DynamixelFunction address)
{
//OXFF 0XFF ID LENGTH INSTRUCTION PARAMETER1 …PARAMETER N CHECK SUM
int pos = 0;

buffer[pos++] = 0xff;
buffer[pos++] = id;

// bodyLength = 4
buffer[pos++] = 4;

//the instruction, read => 2
buffer[pos++] = 2;

// AX12 register
buffer[pos++] = (byte)address;

//bytes to read
buffer[pos++] = 2;

byte checksum = Utils.checkSumatory(buffer, pos);
buffer[pos++] = checksum;

return pos;
}

private static short getQueryResult(byte[] res)
{
short value = -1;

if (res != null)
{
int length = res.Length;
if (res != null && length > 5 && res[4] == 0)
{
byte l = 0;
byte h = res[5];
if (length > 6)
{
l = res[6];
}

value = Hex.fromHexHLConversionToShort(h, l);
}
}
return value;
}

[/sourcecode]

Notes:


To avoid concurrency problems all the operations that use the Dynamixel bus are protected with a Mutex object that avoids that two or more concurrent objects use DynamixelCommunication simultaneously entering the same operation or using the same resources, like variables, objects or the Dynamixel bus.

All the operations use the same buffer, but being protected with the Mutex object I think that is the better option, although in a previous version I used a very different approach where there were AX12 objects with their own buffer.

[Next post: Workshop: USB, serial and remote communications with C#]

domingo, 24 de febrero de 2013

Workshop: Programming a Bioloid robot workbench using C# and C++

[Next post: Dynamixel communications with C#]

It would be a workshop using C# .Net and C++ with Qt 5. The code presented here is used in this two different robots and boards, a HP 214 Ipaq with Windows Mobile and a Raspberry Pi, using the Robotis CM-510 as the servo and sensors controller:

[youtube http://www.youtube.com/watch?v=mvaMTdlb48E&w=281&h=210][youtube http://www.youtube.com/watch?v=Yhv43H5Omfc&w=281&h=210]

These will be the first steps, using C# and .Net , here the code and the exe for the Workbench UI:

Bioloid Workbench


Using this enhaced Toss Mode that adds some new functions.  Some of them:


lunes, 7 de mayo de 2012

Programming CM-510 with C: reading values from terminal and moving a Dynamixel AX-12

Programming CM-510 with C: reading values from terminal and moving a Dynamixel AX-12

In this post we are going to ask the ID AX-12+ that we want to move and the goal position.

The explanations are in the code as comments, I hope that there are enough comments to understand it, let me know if you can't understand it.

The main loop is that easy:

[sourcecode language="c"]
int main(void)
{
init();

while(true) // we'll repeat this looop forever
{
int id=getId(); // get the ID of the AX-12 that we want to move
int position=getPosition(); // get the goal position
dxl_write_word( id, P_GOAL_POSITION_L, position); // sent the command to the Dynamixel
}

return 0;
}
[/sourcecode]

A brief explanation of printf: printf function is much more powerful than it seems at a first sight, it admits many parameters that allow us to display a large amount of data types and formats. In In the following example %i means that in that position the message will include an integer that will be passed as a parameter after the string "AX12 ID:". The control character "n" means a line break.

Each character in the string is stored in a memory location [A][X][1][2][ ][I][D] strings are a special case of array.

getID and getPosition are also very easy, isn't?

[sourcecode language="c"]
/*
The next functions asks for the ID of the AX-12 to move, checking that the ID is a value between 1 and 18
*/

int getId()
{
/*
We define an array enough large, 256 bytes (characters). Probably it's enough with 4 bytes, but if we type more than the defined size we will get an error*/
char buffer[256];

/*
And we define another integer variable, it's very advisable to asign a value in the definition, in this case we assign the minimun value, 1*/
int ax12Id=1;

// puts is very similar to printf, it shows the string that it receives as parameter
puts ("nnMoving a Dynamixel");

do
{ // starting the loop
puts ("Enter the ID of the AX-12 that you wwant to move, between 1 y 18, ");
ax12Id=readInteger(buffer); // this function will read from what we type in the keyboard
//// exclamation (!) is the NOT logical operator. It will repeat the loop while the value is not valid
}while(!isValid(ax12Id, 1, 18));

// Showing the typed value
printf("AX12 ID: %in", ax12Id);

return ax12Id;
}

// Now we will repeat almost the same code that above, it should be pretty easy to write a reusable function, isn't?

int getPosition()
{
char buffer[256];
int position=0;

do
{
puts ("Enter a value between 0 and 1023 as the goal position");
position=readInteger(buffer);
}while(!isValid(position, 0, 1023));

printf("nPosition: %in", position);

return position;
[/sourcecode]

The functions used to read the text from the Terminal are quite interesting, showing the use of a string. It also shows how to use the .h file (declaration) and the .c (definitions, the content of the functions):

[sourcecode language="c"]
// Body (content) of the functions that read data

/*
Recibimos una variable que tiene reservado espacio en memoria para almacenar
la cadena introducida
*/

void readString(char bufferParameter[])
{
int i=0; // We'll use this variable as index of the buffer where we will store data
do
{
bufferParameter[i]=getchar(); // it store the read character in the i position of bufferParameter
putchar(bufferParameter[i]); // showing it
if (bufferParameter[i]=='b') // if Backspace was pressed
i--; // it goes to the previous position, rewritting the previoulsy typed character
else //
i++; // it will write in the next position
}while(bufferParameter[i-1]!='n'); // while the last values is not INTRO. The symmbol ! represents the logical operator NOT

bufferParameter[i]=0; // A NULL (0, zero) is necessary in the last position of any string
}

/*
It read an string, it's converted to integer and returned
*/
int readInteger(char bufferParameter[])
{
readString(bufferParameter);
return atoi(bufferParameter);
}
[/sourcecode]

You can download the sourcecode here

The language C, also C++, has some very interesting features such as the inclusion of code depending on certain conditions. This lets you use the same code for different processors by simply changing one or more parameters.

As an example, this ZIP contains a project for Dev-CPP with a version of the source files for the PC and the CM-510; simply commenting or uncommenting a line in the file "myCM510.h" (for AVR Studio you should create the appropriate project and include the sources files).

Instead of moving AX-12 it displays the text "dxl_write_word" with the parameters received. We can practice C and perform different tests on the PC without connecting any servo.

martes, 1 de mayo de 2012

Bioloid CM-510 programming tutorial: First steps with C

Bioloid programming workshop: First steps with C

(En español)

This brief post starts the Bioloid programming workshop, using ​C, C + + and C# languages  and different controllers: ATMega (CM-510), PC, SBC.

The first steps in C programming

C language is a simple, powerful and extremely versatile tool used to develop software for industries as diverse as the automobile , medical equipment or for the software industry itself, from Microsoft Office to operating systems like Windows or Linux.

This will be a very practical programming workshop with Robotis Dynamixel servos, so I will include links tutorials anb books that include broader and deeper explanations, like C introduction (pdf). But there are a lot:

C Language Tutorial (html)
How C Programming Works (html)
Several C programming tutorials (html)

One of the simplest programs in C:

[sourcecode language="c"]
// This line that begins with two slashes is a comment

/*
These others, starting with a slash and an asterisk
are a comment too, ending with another asterisk and a slash.

The comments are very useful for explaining what we do and,
especially, why we do so, because after a few months we will not remember the details.
*/

/*
The includes are useful to announce the compiler that we will use
existing functions from other files, such as stdio.h, in this example,  to get
the printf function to display information on screen.
(This is not exactly true, but more on that later)
*/
#include

/*
This is one way to start a C program,
Creating the main function as the starting point of every C program:
*/
void main ()

// The body or content of the function starts with the following curly bracket
{

// Guess what does the following function?
printf ("Hello, World");

// And, predictably, the function ends with the closing curly bracket
}
[/sourcecode]

Now we will write the first program for the CM-510

But previously you should install the software needed to program the CM-510. If you install WinAVR in "C:tools WinAVR-20100110" you can download a zip with everything ready to use.

After loading our program in the CM-510, to use RoboPlus Tasks, Motion RoboPlus Robotis and other programs, we will have to restore Robotis firmware.

[sourcecode language="c"]
# Include stdio.h
# Include "myCM510.h"

executeMovement1 void (int ax12Id)
{
dxl_write_word (ax12Id, P_GOAL_POSITION_L, 512);
}

executeMovement2 void (int ax12Id)
{
dxl_write_word (ax12Id, P_GOAL_POSITION_L, 600);
}

int main (void)
{
ax12Id int = 6;

init ();

printf ("\r \n A simple example");

printf ("\r \n Perform movement 1 with the AX-12% i", ax12Id);
executeMovement1 (ax12Id);

printf ("\r \n Pause half a second");
_delay_ms (500); // half-second pause

printf ("\r \n Beep!");
buzzOn (100); // beep

printf ("\r \n Pause for a second");
_delay_ms (1000); // pause for 1 second

printf ("\r \n Perform movement 2 with the AX-12% i", ax12Id);
executeMovement2 (ax12Id);

printf ("\r \n End");
}
[/sourcecode]

The characters "\r \n" are used to jump to the next line in Windows.

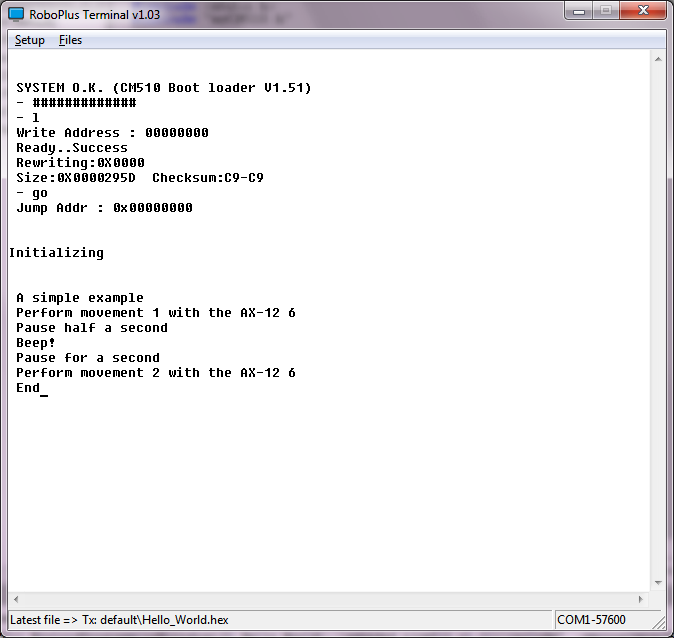
If you have installed the necessary software (WinAVR must be installed in "C:tools WinAVR-20100110") and unzip this zip file in the root directory (C: ) you have to be ready to modify, compile, or simply load the executable "hello_world.hex" in the CM-510. You will see something similar to:

[caption id="attachment_584" align="aligncenter" width="300"]01_Hello_World_CM-510 01_Hello_World_CM-510[/caption]

Some explanations
dxl_write_word (ax12Id, P_GOAL_POSITION_L, 600);

This function is included in the Robotis CM-510 libraries allowing us to send commands to a Dynamixel actuator very easily. We only have to indicate the ID of the AX-12 to move (ax12Id), the code of the order that the AX-12 should execute, in this case go to the goal position (P_GOAL_POSITION_L), and the position in which has to be placed between 0 and 1024 (600 in the example).

dx_series_goal


Highlights:

Decompose the program into different parts

  •     Having previously created the init () function in myCM510.h/myCM510.c allows us to include it easily in this program.

  •     In addition to simplifying programming we can reuse the same code in different programs. This saves us from having to repeat the same code many times and, especially, have to correct faults or improve in only one point, . Later we will see how to organize directories and even how to create libraries.

  •     It also allows us to encapsulate the details, so that when the program starts growing we can handle them easily without being overwhelmed.


Showing what is doing running the program


Using the printf function we can send text to the screen that lets us know what is doing the program (printf sends to the serial port, "RoboPlus Terminal" read it  and displays it on the screen. We will lear how to read from the serial port when we start programming Bioloid using a PC or SBC)

Can you think of an easy way to avoid having two similar functions such as "void executeMovement1 (int ax12Id)" and "void executeMovement2 (int ax12Id)"?

lunes, 9 de abril de 2012

Learning scurves with AX-12

I'm learning how to use scurves with AX-12, so I've created a test CM-510 C program where I try different approachs. Any help will be very well received, because my goal is to control several AX-12 and I'm far far away from it!

Here is the program with an spreadsheet with the calculations (LibreOffice and Excel). I have started from an old post from Bullit in the Tribotix forum (now in PDF format at Robosavvy)

Clockwise is the standard motion, counter clockwise is the scurve intended motion

[youtube http://www.youtube.com/watch?v=YBdO0232QvQ]

lunes, 5 de marzo de 2012

Linux C++ Dynamixel reading and writing example

If you will like to use some boards like Raspberry or Beagleboard C++ is a great choice. So here you have a working Linux C++ Dynamixel reading and writing example. The main difference is the serial port access:

Here you can download the Eclipse project zipped

Here you can find several combinations of hardware, firmware and programming tools.

The main body


[sourcecode language="cpp"]
#include <iostream>
using namespace std;

#include "SerialPort.h"
#include "Dynamixel.h"

int main() {
cout << "AX Control starts" << endl; // prints AX Control

int error=0;
int idAX12=18;

SerialPort serialPort;
Dynamixel dynamixel;

if (serialPort.connect("//dev//ttyS0")!=0) {
dynamixel.sendTossModeCommand(&serialPort);

int pos=dynamixel.getPosition(&serialPort, idAX12);

if (pos>250 && pos <1023)
dynamixel.setPosition(&serialPort, idAX12, pos-100);
else
printf ("nPosition <%i> under 250 or over 1023n", pos);

serialPort.disconnect();
}
else {
printf ("nCan't open serial port");
error=-1;
}

cout << endl << "AX Control ends" << endl; // prints AX Control
return error;
}
[/sourcecode]

Header


[sourcecode language="cpp"]
#ifndef SERIALPORT_H_
#define SERIALPORT_H_

#include <stdio.h>
#include <termios.h>
#include <fcntl.h>
#include <unistd.h>

class SerialPort {
private:
int fileDescriptor;

public:
int connect ();
int connect (char * device);
void disconnect(void);

int sendArray(unsigned char *buffer, int len);
int getArray (unsigned char *buffer, int len);

int bytesToRead();
void clear();
};

#endif /* SERIALPORT_H_ */
[/sourcecode]

Body:


[sourcecode language="cpp"]
#include <string.h>
#include <sys/ioctl.h>

#include "SerialPort.h"

int SerialPort::connect() {
return connect("//dev//ttyS0");
}

int SerialPort::connect(char *device) {
struct termios terminalAttributes;

/*
* http://linux.die.net/man/2/open
*
* Open the serial port
* read/write
* not become the process's controlling terminal
* When possible, the file is opened in nonblocking mode
*
*/
fileDescriptor = open(device, O_RDWR | O_NOCTTY | O_NDELAY | O_FSYNC );

// clear terminalAttributes data
memset(&terminalAttributes, 0, sizeof(struct termios));

/*    http://linux.die.net/man/3/termios
*
*  control modes: c_cflag flag constants:
*
* 57600 bauds
* 8 bits per word
* Ignore modem control lines.
* Enable receiver.
*/

terminalAttributes.c_cflag = B57600 | CS8 | CLOCAL | CREAD;

/*
* input modes: c_iflag flag constants:
*
* Ignore framing errors and parity errors.
* (XSI) Map NL to CR-NL on output.
*/
terminalAttributes.c_iflag = IGNPAR |  ONLCR;

/*
* output modes: flag constants defined in POSIX.1
*
* Enable implementation-defined output processing.
*/

terminalAttributes.c_oflag = OPOST;

/*
* Canonical and noncanonical mode
*
* min time
* min bytes to read
*/

//terminalAttributes.c_lflag = ICANON;
terminalAttributes.c_cc[VTIME] = 0;
terminalAttributes.c_cc[VMIN] = 1;

/*
* http://linux.die.net/man/3/tcsetattr
* Set the port to our state
*
* the change occurs immediately
*/

tcsetattr(fileDescriptor, TCSANOW, &terminalAttributes);

/*
* http://linux.die.net/man/3/tcflush
*
* flushes data written but not transmitted.
* flushes data received but not read.
*/

tcflush(fileDescriptor, TCOFLUSH);
tcflush(fileDescriptor, TCIFLUSH);

return fileDescriptor;
}

void SerialPort::disconnect(void)
{
close(fileDescriptor);
printf("nPort 1 has been CLOSED and %d is the file descriptionn", fileDescriptor);
}

int SerialPort::sendArray(unsigned char *buffer, int len) {
int n=write(fileDescriptor, buffer, len);
return n;
}

int SerialPort::getArray (unsigned char *buffer, int len)
{
int n1=bytesToRead();
int n=read(fileDescriptor, buffer, len);
return n;
}

void SerialPort::clear()
{
tcflush(fileDescriptor, TCIFLUSH);
tcflush(fileDescriptor, TCOFLUSH);
}

int SerialPort::bytesToRead()
{
int bytes=0;
ioctl(fileDescriptor, FIONREAD, &bytes);

return bytes;
}
[/sourcecode]

martes, 7 de febrero de 2012

Choose hardware, firmware and language

There are a lot of possible combinations of hardware, firmware and languages for programming Bioloid. I think that the table below show the the main combinations.

You can choose from the easy but limited Robotis own tool (Roboplus Task) and only your CM-5 or CM-510 to a SBC or "embedded" PC like Roboard and any language which can manage a serial port connection, like C, C++, Java, Python,...

Linux C++ Dynamixel reading and writing example

C# Dynamixel reading and writing example

Practical C++ programming tutorial for Bioloid

[caption id="attachment_256" align="aligncenter" width="617"]Programming Bioloid: choose hardware, firmware and languages Programming Bioloid: choose hardware, firmware and languages[/caption]

Robotis officially supports the programming solutions with the blue background:

  • The dark blue, RoboPlus Tasks, is the only one in which you can create the motions with RoboPlus Motion and execute it in CM-5/CM-510 with the program create with RoboPlus Tasks, after downloading the generated executable into the CM-5/CM-510, of course.


With these programming solutions you can use the Zigbee SDK to send and receive data between the CM5-/CM-510 and any computer, using Zig-110A or the new bluetooth BT-110, the Zig2Serial and the USB2Dynamixel. You can download example in Visual Basic .Net, C# and Visual C++

But there are more options!

Using a PC, SBC (Single Board Computer), PDA, Mobile or other light and battery powered computer

Using a serial port connection with your more beloved programming language:

  • USB2Dynamixel


If you have any device with a USB host and a FTDI driver you can use USB2Dynamixel to command programatically your Dynamixel servos using the Dynamixel protocol. You only will need your CM-5 or CM-510 to connect your Dynamixel to the battery.

  • Serial port cable


Same as the previous option but instead of using the USB2Dynamixel you only will need the serial cable and the "Toss Mode" launched with the 't' command from the "Manage Mode"


  • Wireless control


Instead of only sending and receiving data, with the previous wireless connections you can command remotely your robot using the standard firmware and the "Toss Mode" launched with the 't' command from the "Manage Mode". You will need to command it using the Dynamixel protocol.

With these options and the CM-510 you will find a little problem... there is no way to read your sensor values! Well, you can use this firmware that offers a "Toss Mode" that supports reading CM-510 ports.

Start learning!

If you want to start learning how to program your CM-5 or CM-510 controller you will find interesting this post "Start programming  CM-5/CM-510 in C". But may be you prefer to control your robot from a PC, SBC or other computer in C++ or C#

sábado, 10 de diciembre de 2011

Writing Dynamixel AX-12+ position

The intent of this code is to be clear and easy to understand, it not pretend to be the best code to do the job.

This method create the command to write the AX-12+ position :

[sourcecode language="cpp"]
int Dynamixel::getSetAX12PositionCommand(byte id, short goal)
{
int pos = 0;
byte numberOfParameters = 0;
//OXFF 0XFF ID LENGTH INSTRUCTION PARAMETER1 …PARAMETER N CHECK SUM

buffer[pos++] = 0xff;
buffer[pos++] = id;

// bodyLength
buffer[pos++] = 0; //place holder

//the instruction, query => 3
buffer[pos++] = 3;

// goal registers 30 and 31
buffer[pos++] = 0x1E;// 30;

//bytes to write
byte hexH = 0;
byte hexL = 0;
toHexHLConversion(goal, &hexH, &hexL);
buffer[pos++] = hexL;
numberOfParameters++;
buffer[pos++] = hexH;
numberOfParameters++;

// bodyLength
buffer[3] = (byte)(numberOfParameters + 3);

byte checksum = checkSumatory(buffer, pos);
buffer[pos++] = checksum;

return pos;
}

int Dynamixel::setPosition(SerialPort *serialPort, int idAX12, int position)
{
int error=0;

int n=getSetAX12PositionCommand(idAX12, position);
long l=serialPort->sendArray(buffer,n);
Sleep(10);

memset(bufferIn,0,BufferSize);
n=serialPort->getArray(bufferIn, 8);

if (n>4 && bufferIn[4] == 0)
printf("nid=<%i> set at pos=<%i>n", idAX12, position);
else {
error=-1;
printf("nid=<%i> error: <%i>n", idAX12, bufferIn[4]);
bf(bufferIn, n);
}

return error;
}

[/sourcecode]

miércoles, 23 de noviembre de 2011

Reading Dynamixel AX-12+ position

The intent of this code is to be clear and easy to understand, it not pretend to be the best code to do the job.

This method create the command to read the AX-12+ position :

[sourcecode language="cpp"]
int Dynamixel::getReadAX12PositionCommand(byte id)
{
//OXFF 0XFF ID LENGTH INSTRUCTION PARAMETER1 …PARAMETER N CHECK SUM
int pos = 0;

buffer[pos++] = 0xff;
buffer[pos++] = id;

// length = 4
buffer[pos++] = 4; //placeholder

//the instruction, read => 2
buffer[pos++] = 2;

// pos registers 36 and 37
buffer[pos++] = 36;

//bytes to read
buffer[pos++] = 2;

byte checksum = checkSumatory(buffer, pos);
buffer[pos++] = checksum;

return pos;
}

int Dynamixel::getPosition(SerialPort *serialPort, int idAX12)
{
int ret=0;

int n=getReadAX12PositionCommand(idAX12);
long l=serialPort->sendArray(buffer,n);
Sleep(2);

memset(bufferIn,0,BufferSize);
n=serialPort->getArray(bufferIn, 8);

short pos = -1;
if (n>7)
{
pos = fromHexHLConversion(bufferIn[5], bufferIn[6]);
}

printf("nid=<%i> pos=<%i> length=<%i>n", idAX12, pos, n);
if (pos<0 || pos > 1023)
ret=-2;
else
ret=pos;

return ret;
}
[/sourcecode]

Practical C++ programming tutorial for Bioloid robots

This is the main block of a simple Dynamixel example program using serial port.

Do you want to use the usb2dybnamixel? Changing it will be very easy. Here you can find several combinations of hardware, firmware and programming tools.

Here the Visual Studio C++ zipped project. And if you use this firmware you also can query sensor port values with this example: