Mostrando entradas con la etiqueta Tutorials. Mostrar todas las entradas

miércoles, 20 de noviembre de 2013

(I) Reading sensors connected to Robotis CM-510

cm-510 sensorsUsing the Dynamixel SDK instead of RoboPlus Tasks is not possible to query sensors connected to the CM-5xx controller. But, of course, using standard programming languages, like C++, and tools, line QT Creator or Eclipse, with its full featured IDEs and debuggers is a hugue gain.

So I created a firmware for the CM-510 which can be queried and receive commands to itself, including its sensors, or to Dynamyxel devices.

The idea is very simple:

This program running in the CM-510 receives:

- commands or queries to IDs of Dynamixel devices. These are not processed, only redirected to the Dynamixel bus only if it was received by serial port ( serial cable or zigbee). If it was received from the Dynamixel bus nothing is done.

- commands or queries to the CM-510 ID (I chose ID=200), like beep, or to the sensors connected to it. This commands and queries are processed in the CM-510, basically querying the sensors.

In both cases the answer is sent to the connection from which the query or command was received.

After power on the CM-510, you can select the mode with the 4 cursor keys as showed in a terminal connected to its serial port:

"For 'Toss mode' press (Up), for 'Device mode' (Down), for 'Device debug mode' (Left),to start press (Right)"

In the Device mode:

all the receptions and sends are through the Dynamixel bus, the CM-510 is simply another device.

In the Toss mode:

- what is received from the serial connection is sent to the Dynamixel bus or processed in the CM-510 (If sent to its ID)

-what is received from the Dynamixel bus is sent to the serial connection

Finally, the Debug mode:

is like the Device mode, but all the debug messages included in the CM-510 are sent to the serial connection.

A complete sequence with code snippets from the CM-510 program and from the code running in the other computer:

Some C++ code snippets from this example: (C# in the next post)


[sourcecode language="cpp"]
enum AX12Address //and functions implemented in the CM-510 program, like
{
ReadCM510SensorRaw = 1,
Beep = 8,
ReadCM510SensorFiltered = 4,
SetSensorValuesToFilter = 5,
...
}
[/sourcecode]

[sourcecode language="cpp"]
void doBeep()
{
cout << "Beep" << endl;
mySystem.dynamixelCommunication.sendOrder(100, AXS1_Buzzer, (byte) DO, (short) 500);
usleep (200000);
mySystem.dynamixelCommunication.sendOrder(200,MyCommunications::Beep short)5);
}
[/sourcecode]

Querying sensor:

[sourcecode language="cpp"]
void doQuerySensor()
{
int sensorPort=getSensorPort();
int value=mySystem.dynamixelCommunication.readSensorValue (200,ReadCM510SensorRaw, sensorPort);
cout << "the sensor reads: [" << value << "] " << endl << endl << endl;
}
[/sourcecode]

These command and query are processed in the CM-510:

Getting the sensor value:

[sourcecode language="c"]

int executeCM510Function()
{
...
case F_GET_SENSOR_VALUE_RAW:
values[1] = getSensorValueRaw(parameters[1]);
break;

case F_GET_SENSOR_VALUE_FILTERED:
values[1] = getSensorValueFiltered(parameters[1], sensorValuesToFilterDefined);
break;

case F_GET_TWO_DMS_SENSOR_VALUES:
parametersReceived=3;
getTwoDMSSensorsValues();
break;

case F_GET_MULTIPLE_SENSOR_VALUE:
getMultipleSensorsValues();
break;

case F_DO_SENSOR_SCAN:
values[1]= sensorScan(parameters[1]);
break;

case F_SET_VALUE_DMS1 : //set default value DMS1
DMS1=parameters[1];
break;

case F_SET_VALUE_DMS2 : //set default value DMS1
DMS2=parameters[1];
break;

case F_BEEP:
if (debugMode)
printf("executeCM510Function beep\n");
beep();
break;

case F_SET_SENSOR_VALUES_TO_FILTER:
sensorValuesToFilterDefined=parameters[1];
break;
}

return function;
}

}
...
int getSensorValueRaw(unsigned char portId)
{
ADCSRA = (1 << ADEN) | (1 << ADPS2) | (1 << ADPS1);

setPort(portId);
//PORTA &= ~0x80;
//PORTA &= ~0x20;

//_delay_us(12); // Short Delay for rising sensor signal
_delay_us(24);
ADCSRA |= (1 << ADIF); // AD-Conversion Interrupt Flag Clear
ADCSRA |= (1 << ADSC); // AD-Conversion Start

while( !(ADCSRA & (1 << ADIF)) ); // Wait until AD-Conversion complete

PORTA = 0xFC; // IR-LED Off

//printf( "%d\r\n", ADC); // Print Value on USART

//_delay_ms(50);
_delay_ms(ReadSensorDelayMS);

return ADC;
}

[/sourcecode]


[sourcecode language="c"]

void beep()
{
buzzOn(100);
buzzOff();
}
[/sourcecode]

But we can do a little more with the CM-510 processor, we can do some filtering to the sensor values.

The readings from the DMS are usually somewhat erratic, so we can simply:

- discard the minimum and maximum values:

- if we take 5 more than measures, then return the average if the are more than 3, if 3 or less it

Previously we should set how many readings should be done, if not, the default number of readings are 5:

[sourcecode language="c"]
int getSensorValueFiltered(unsigned char portId, int times)
{
...
switch(function)
{
case F_GET_SENSOR_VALUE_RAW:
values[1] = getSensorValueRaw(parameters[1]);
break;

case F_GET_SENSOR_VALUE_FILTERED:
values[1] = getSensorValueFiltered(parameters[1], sensorValuesToFilterDefined);
break;

case F_GET_TWO_DMS_SENSOR_VALUES:
parametersReceived=3;
getTwoDMSSensorsValues();
break;

case F_GET_MULTIPLE_SENSOR_VALUE:
getMultipleSensorsValues();
break;

case F_DO_SENSOR_SCAN:
values[1]= sensorScan(parameters[1]);
break;

case F_SET_VALUE_DMS1 : //set default value DMS1
DMS1=parameters[1];
break;

case F_SET_VALUE_DMS2 : //set default value DMS1
DMS2=parameters[1];
break;

case F_BEEP:
if (debugMode)
printf("executeCM510Function beep\n");
beep();
break;

case F_SET_SENSOR_VALUES_TO_FILTER:
sensorValuesToFilterDefined=parameters[1];
break;
}
...
[/sourcecode]

We also can take values from multiple sensors with one query, but It will be explained in the next post...

domingo, 23 de junio de 2013

Arduino C++ crash examples tutorial using Duemilanove (I)

This is the first example in a serie of cheap (absolutely free and cheap) articles to get some basic and practical C++ knowledge. It will references the great explanations provided at www.cplusplus.com C++ tutorial. Using Arduino Duemilanove (well, really it's a Funduino).

Here you can download The file with the code, and you can find links to a lot of free tutorials, courses and books to learn C++ here.


[sourcecode language="cpp"]
// C++ crash tutorial with Arduino Duemilanove.

// First example: http://softwaresouls.com/softwaresouls/2013/06/23/c-crash-tutorial-using-robotis-cm-900-board-and-ide-i/

/*
Hello World shows messages on construction and destruction
Also it lets you to salute.
Showing always its assigned identifiction number MyId
*/
class HelloWorld
{
private:
int myId; //Object identification num ber

public:

// class constructor http://www.cplusplus.com/doc/tutorial/classes/
HelloWorld(char *message, byte id)
{
myId=id;
Serial.print(message);
printId();
}

// class destructor http://www.cplusplus.com/doc/tutorial/classes/
~HelloWorld()
{
Serial.print ("Destructing object: ");
printId();
}

void printId()
{
Serial.print(" ID:");
Serial.println(myId);
Serial.println(" ");
}

void Salute(char *name)
{
Serial.print("Hi!, ");
Serial.println(name);
Serial.print("Regards from object: ");
printId();
}
};

/*
void setup() function it's only executed one time at the start of the execution.
It is called from a hidden main() function in the Ronbotis CM-900 IDE core.

\ROBOTIS-v0.9.9\hardware\robotis\cores\robotis\main.cpp
Note: "while (1)" is a forevr loop ( http://www.cplusplus.com/doc/tutorial/control ):

(Basic structure http://www.cplusplus.com/doc/tutorial/program_structure/)

int main(void) {
setup();

while (1) {
loop();
}
return 0;
}
*/
void setup()
{
Serial.begin(57600); //initialize serial USB connection
delay(3000); //We will wait 3 seconds, let the user open (Control+Shift+M) the Monitor serial console
}

//We will not see neither the construction nor the destruction of this global object because serial port it's not still initiated
HelloWorld hw0("construction object", 0); //Object construction http://www.cplusplus.com/doc/tutorial/classes/

// A counter to see progress and launch events
int iterationCounter=0; //An integer variable to count iterations http://www.cplusplus.com/doc/tutorial/variables

// void loop() will be executing the sentences it contains while CM-900 is on.
void loop()
{
// Lets's show only the first 5 iterations http://www.cplusplus.com/doc/tutorial/control/
if (iterationCounter<5)
{
Serial.print("starting iteration #");
Serial.println(++iterationCounter); // firts, iterationCounter is incremented and then printed

// We will see the consttructiona and destruction messages from this local (inside the loop function) object. Object construction http://www.cplusplus.com/doc/tutorial/classes/
HelloWorld hw1("constructing object", 1);
hw1.Salute("Joe");

if (iterationCounter==3)
{
// We will see the consttruction and destruction messages from this local (inside the "if" block inside the "loop" function) object. Objet construction http://www.cplusplus.com/doc/tutorial/classes/
HelloWorld hw2("constructing object", 2);
hw2.Salute("Jones");
} // Objet hw2 destruction http://www.cplusplus.com/doc/tutorial/classes/

//Let's show that object hw0 is alive
hw0.Salute("Pepe");

Serial.print("ending iteration #");
Serial.println(iterationCounter++); // first cpunter is printed, then incremented.
} // Objet hw1 destruction http://www.cplusplus.com/doc/tutorial/classes/
} // Program end. Objet hw0 destruction http://www.cplusplus.com/doc/tutorial/classes/
[/sourcecode]

martes, 28 de mayo de 2013

[UPDATED] A simple but pretty complete Linux C++ example for Bioloid

[Jun 12, 2013, Some source code typos fixed and code updated]:

.
.
.
.
.

[sourcecode language="cpp"]
bool nonValidOption(int option)
{
return (optionMaxOption);
}
[/sourcecode]

This is a very simple but pretty complete example, trying to use the least possible dependencies. I have tested in a just installed Ubuntu and you only needed the AXControl library (I created and use it because then there were no Robotis library and because it can use serial port, Dynamixel bus, Zigbee, BT (Robotis or other adaptors)

It use the terminal, no QT, to avoid library dependencies. But you should add the AXControl_v2 lib files to your /usr/lib folder as administrator (sudo). Click here if you want one unique executable for Linux (tested with Linux Mint 14) using these sources files

When executed, it shows the values configured in the HexaWheels.conf file and any problem it founds, like SerialPort2Dynamixel.open(ss)=> [Serial port NOT opened]:


ubuntu@A3820 ~/projects/trunk/bioloid/Herramientas/CommandLine $ ./commandline
init to load configuration(ss)=> [./HexaWheels.conf]
Configuration file=> (ss)=> [./HexaWheels.conf]
Tiempo_Espera_ms(ss)=> [35]
Tiempo_Espera_Sensores_ms(ss)=> [60]
Nombre_Puerto_Serie(ss)=> [/dev/ttyUSB0]
Baudios_Puerto_Serie(ss)=> [1000000]
Motion_File_Name(ss)=> [HexaWheels_2.0.mtn]
UmbralContacto(ss)=> [550]
UmbralDeteccion(ss)=> [200]
loadConfigurationValues: (si)=> [134529476]
getIntValue: (ss)=> [Tiempo_Espera_ms]
getIntValue: (ss)=> [Tiempo_Espera_Sensores_ms]
getIntValue: (ss)=> [Baudios_Puerto_Serie]
getStringValue: (ss)=> [Nombre_Puerto_Serie]


Device /dev/ttyUSB0, Speed B1000000
SerialPort2Dynamixel.open(ss)=> [Serial port NOT opened]
SerialPort2Dynamixel.open, serialPortName(ss)=> [/dev/ttyUSB0]
SerialPort2Dynamixel.open, baudRate(si)=> [4104]
I can't open DynamixelCommunication, name: (ss)=> [/dev/ttyUSB0]
terminate called after throwing an instance of 'std::exception*'
Aborted

If it can connect an there are no problem you should see:


ubuntu@A3820 ~/projects/trunk/bioloid/Herramientas/CommandLine $ ./commandline
init to load configuration(ss)=> [./HexaWheels.conf]
Configuration file=> (ss)=> [./HexaWheels.conf]
Tiempo_Espera_ms(ss)=> [35]
Tiempo_Espera_Sensores_ms(ss)=> [60]
Nombre_Puerto_Serie(ss)=> [/dev/ttyUSB0]
Baudios_Puerto_Serie(ss)=> [1000000]
Motion_File_Name(ss)=> [HexaWheels_2.0.mtn]
UmbralContacto(ss)=> [550]
UmbralDeteccion(ss)=> [200]
loadConfigurationValues: (si)=> [134529476]
getIntValue: (ss)=> [Tiempo_Espera_ms]
getIntValue: (ss)=> [Tiempo_Espera_Sensores_ms]
getIntValue: (ss)=> [Baudios_Puerto_Serie]
getStringValue: (ss)=> [Nombre_Puerto_Serie]


Device /dev/ttyUSB0, Speed B1000000
SerialPort2Dynamixel.open, serialPortName(ss)=> [/dev/ttyUSB0]
SerialPort2Dynamixel.open, baudRate(si)=> [4104]
V01
2.- Toggle AX-12 LED
3.- Query AX-12
4.- Move AX-12
5.- Torque AX-12
6.- Query CM-510 sensor
7.- Show menu
8.- Beep
9.- Quit
Select option (2-9)

[sourcecode language="cpp"]

/*------------------------------------------------------------------------------*\
* This source file is subject to the GPLv3 license that is bundled with this *
* package in the file COPYING. *
* It is also available through the world-wide-web at this URL: *
* http://www.gnu.org/licenses/gpl-3.0.txt *
* If you did not receive a copy of the license and are unable to obtain it *
* through the world-wide-web, please send an email to *
* siempre.aprendiendo@gmail.com so we can send you a copy immediately. *
* *
* @category Robotics *
* @copyright Copyright (c) 2011 Jose Cortes (<a href="https://plus.google.com/105007891378677151287/about">https://plus.google.com/105007891378677151287/about</a>) *
* @license http://www.gnu.org/licenses/gpl-3.0.txt GNU v3 Licence *
* *
\*------------------------------------------------------------------------------*/

#include "stdafx.h"
#include
#include "BasicSystem.h"
#include "Util.h"

using namespace std;

class UI
{
public:
static const int OptionQuit=8;

UI(MyBasicSystem::BasicSystem& aMySystem) : mySystem(aMySystem) {}

void showMenu();
int selectOption();
bool executeSelectedOption(int selected);
void doBeep();

private:
MyBasicSystem::BasicSystem mySystem;

static const int OptionSetLEDOnOff=1;
static const int OptionQueryAX12=2;
static const int OptionMoveAX12=3;
static const int OptionTorqueAX12=4;
static const int OptionQuerySensor=5;
static const int OptionShowMenu=6;
static const int OptionBeep=7;

static const int MinOption=OptionSetLEDOnOff;
static const int MaxOption=OptionQuit;

bool validRange(int value, int MinValue, int MaxValue);
bool nonValidOption(int option);
int getPosition();
int getId();
int getSensorPort();
void doGetPosition();
void doSetPosition();
void doQuerySensor();
void doSetLEDOnOff();
void doSetTorqueOnOff();

};

void UI::showMenu()
{
cout << "V02" << endl;

cout << OptionSetLEDOnOff << ".- Toggle AX-12 LED" << endl;
cout << OptionQueryAX12 << ".- Query AX-12" << endl;
cout << OptionMoveAX12 << ".- Move AX-12" << endl;
cout << OptionTorqueAX12 << ".- Torque AX-12" << endl;
cout << OptionQuerySensor << ".- Query CM-510 sensor" << endl;
cout << OptionShowMenu << ".- Show menu" << endl;
cout << OptionBeep << ".- Beep" << endl;
cout << OptionQuit << ".- Quit" << endl;
}

bool UI::nonValidOption(int option)
{
return (optionMaxOption);
}

int UI::selectOption()
{
int option=-1;

while (nonValidOption(option))
{
cout << "Select option (" << MinOption << "-" << MaxOption << ")" << endl; cin >> option;
if (nonValidOption(option))
{
cout << endl;
cout << endl;
cout << "(" << option << ") is NOT a valid option" << endl; } } return option; } bool UI::validRange(int value, int MinValue, int MaxValue) { return (value>=MinValue && value<=MaxValue);
}

int UI::getPosition()
{
int position=0;

do
{
cout << "Type a value between 0 and 1023 to set the AX-12 in that position" << endl; cin>>position;

}while(!validRange(position, 0, 1023));

cout << "Position:" << position << endl; return position; } int UI::getId() { int ax12Id=1; do { puts ("Type the ID of the AX-12 to use, a value between 1 and 18, "); cin >> ax12Id;

}while(!validRange(ax12Id, 1, 18));

cout << "AX12 Id:" << ax12Id << endl; return ax12Id; } int UI::getSensorPort() { int sensorPort=1; do { puts ("Type the sensor Port to read, a value between 1 and 6, "); cin >> sensorPort;

}while(!validRange(sensorPort, 1, 6));

cout << "Sensor Port number:" << sensorPort << endl;

return sensorPort;
}

void UI::doBeep()
{
cout << "Beep" << endl;
mySystem.dynamixelCommunication.sendOrder(100, AXS1_Buzzer, (byte) DO, (short) 500);
Sleep (2);
mySystem.dynamixelCommunication.sendOrder(200, MyCommunications::Beep, (byte) 5);
}

void UI::doGetPosition()
{
int ax12Id=getId();

int position = mySystem.dynamixelCommunication.readValue(ax12Id, MyCommunications::PresentPosition);
cout << "the position is: [" << position << "] " << endl << endl << endl;
}

void UI::doSetPosition()
{
int ax12Id=getId();
int position=getPosition();

mySystem.dynamixelCommunication.sendOrder(ax12Id, MyCommunications::GoalPosition,(short) position);

}

void UI::doQuerySensor()
{
int sensorPort=getSensorPort();

int value=mySystem.dynamixelCommunication.readSensorValue (200, ReadCM510SensorRaw, sensorPort);
cout << "the sensor reads: [" << value << "] " << endl << endl << endl;
}

void UI::doSetLEDOnOff()
{
byte lByte=0, hByte=0;
int ledValue;

int ax12Id=getId();

ledValue=mySystem.dynamixelCommunication.readValue(ax12Id, MyCommunications::LED);
Hex::toHexHLConversion(ledValue, hByte, lByte);

bool onOff=false;
if (lByte!=0)
onOff=true;

cout << "The LED is: [" << (onOff?"on":"off") << "], putting it: [" << (onOff?"Off":"on") << "] " << endl << endl << endl;
mySystem.dynamixelCommunication.sendOrder(ax12Id, MyCommunications::LED, byte(onOff?0:1));
}

void UI::doSetTorqueOnOff()
{
byte lByte=0, hByte=0;
int ax12Id=getId();

int torque=mySystem.dynamixelCommunication.readValue(ax12Id, MyCommunications::Torque);
Hex::toHexHLConversion(torque, hByte, lByte);
bool onOff=(lByte!=0?true:false);

cout << "The Torque is: [" << (onOff?"on":"off") << "], putting it: [" << (onOff?"Off":"on") << "] " << endl << endl << endl;

mySystem.dynamixelCommunication.sendOrder(ax12Id, MyCommunications::Torque,(byte) (onOff?0:1));
}

bool UI::executeSelectedOption(int option)
{
bool isOk=true;
cout << endl;
cout << endl;

cout << "Selected option: [" << option << "] " << endl;

switch(option)
{
case OptionSetLEDOnOff:
doSetLEDOnOff();
break;
case OptionQueryAX12:
doGetPosition();
break;
case OptionMoveAX12:
doSetPosition();
break;
case OptionTorqueAX12:
doSetTorqueOnOff();
break;
case OptionQuerySensor:
doQuerySensor();
break;
case OptionShowMenu:
showMenu();
break;
case OptionBeep:
doBeep();
break;
}

return isOk;
}

int _tmain(int argc, _TCHAR* argv[])
{
cout << "AXControl_v2_VS_CPP test v0" << endl;

bool quit=false;
MyBasicSystem::BasicSystem mySystem;
UI ui(mySystem);
do
{
ui.showMenu();
int selected=ui.selectOption();
if (selected==ui.OptionQuit)
quit=true;
ui.executeSelectedOption(selected);
}while (!quit);

mySystem.dynamixelCommunication.close();

return 0;
}

[/sourcecode]

lunes, 15 de abril de 2013

CM-900 Robotis IDE more programming examples

I've started to program CM-900 "translating" the example from the C programming tutorial for CM-510

CM900_with_its parts_names

You can get more information at robotsource.org CM-900 community circle and the CM-900 e-manual. There you can find:

- Quick start guide

- Presentation Workshop

- Arduino based IDE to program it very easily (examples included)

- Source code and instructions

- Using other servos

- Interfacing sensors

I already have "translated" two examples: a simple "hello world" like where a servo is move to 2 different positions and another where the servo id and position is asked and after entered the data the servo is positionated in the typed position, validating that id and position are in range.

The "hello World " example (here the zipped file):

[sourcecode language="c"]
#define P_GOAL_POSITION_L     30
#define P_MOVING              46

int counter;
int onlyOnceHappened;

void setup()
{
//USB Serial initialize

onlyOnceHappened=0;
counter=0;

SerialUSB.begin();
Dxl.begin(1);
delay (5000);
SerialUSB.println("Setup");
}

void loop()
{

delay (3000);
SerialUSB.print("loop");
SerialUSB.println(counter);
counter++;
delay(1000);

if (onlyOnceHappened==0)
{
onlyOnceHappened=1;
SerialUSB.println("Hello, World");
}

int id=8;

SerialUSB.println ("Simple example #0");

SerialUSB.print ("Perform movement 1 with the AX-12:");
SerialUSB.println (id);
byte bMoving = Dxl.readByte( id, P_MOVING);
byte CommStatus = Dxl.getResult();
if( CommStatus == COMM_RXSUCCESS )
Dxl.writeWord( id, P_GOAL_POSITION_L, 511 );
else
SerialUSB.println ("CommStatus IS NOT COMM_RXSUCCESS");

SerialUSB.println ("Pause half a second");
delay (500); // half-second pause

SerialUSB.println ("Beep!");
//buzzOn (100); // beep

SerialUSB.println ("Pause for a second");
delay (1000); // pause for 1 second

SerialUSB.print ("Perform movement 2 with the AX-12: ");
SerialUSB.println (id);

Dxl.writeWord( id, P_GOAL_POSITION_L, 611 );

SerialUSB.println ("End");

}
[/sourcecode]

Asking Id and Position example, (here the zipped file)

[sourcecode language="c"]

int counter;
bool onlyOnceHappened;

int id;
int position;

bool debugOutputOn;
char charReaded;

void debugOutputUSB(char *buffer, bool newlineAfterMessage)
{
if (debugOutputOn)
{
if (newlineAfterMessage)
SerialUSB.println(buffer);
else
SerialUSB.print(buffer);
}
}

void debugOutputUSB(int value, bool newlineAfterMessage)
{
if (debugOutputOn)
{
if (newlineAfterMessage)
SerialUSB.println(value);
else
SerialUSB.print(value);
}
}

void debugOutputPairUSB(char *buffer, int value)
{
if (debugOutputOn)
{
SerialUSB.println ("");
SerialUSB.print(buffer);
SerialUSB.println(value);
}
}

void debugOutputPairUSB(char *buffer1, char *buffer2)
{
if (debugOutputOn)
{
SerialUSB.println ("");
SerialUSB.print(buffer1);
SerialUSB.println(buffer2);
}
}

void setup()
{
//USB Serial initialize

onlyOnceHappened=false;
counter=0;
debugOutputOn=false;

SerialUSB.begin();
Dxl.begin(1);
delay (3000);

debugOutputUSB("Setuped", true);
}

void checkIfDebugOn()
{
SerialUSB.print("Put debug ON?, y/n");
charReaded=SerialUSB.read();

if (charReaded=='y' || charReaded=='Y')
debugOutputOn=true;
else
debugOutputOn=false;

debugOutputPairUSB ("DebugPut is:", debugOutputOn);
}

void loop()
{
delay (1500);
SerialUSB.println ("Simple example #1");

if (onlyOnceHappened==false)
{
onlyOnceHappened=true;
checkIfDebugOn();
}

debugOutputPairUSB  ("Loop: ",counter);
counter++;
delay(500);

debugOutputUSB("Starting loop", true);

while(true) // we'll repeat this loop forever
{
id=getId(); // get the ID of the AX-12 that we want to move
position=getPosition(); // get the goal position

Dxl.writeWord( id, P_GOAL_POSITION_L, position); // sent the command to the Dynamixel
debugOutputUSB ("Dxl.writeWorded", true);
}
}
// I have created a simple ayoi because I have problem compiling atoi
int myatoi(char *buffer)
{
int len=strlen(buffer)-2;
int value=0;
int i=0;
int base=0;
int number=0;

for (i=len;i>=0;i--)
{
number=int(buffer[i])-int('0');

debugOutputPairUSB ("buffer[i]: ", int(buffer[i]));

if (i==len)
{
value=number;
}
else
{
value+=base * number;
}

debugOutputPairUSB ("i: ",i);
debugOutputPairUSB ("number: ", number);
debugOutputPairUSB("base: ", base);
debugOutputPairUSB("valor: ", value);

if (base==0)
{
base=10;
}
else
base=base*10;
}

return value;
}

bool isValid(int value, int MinValue, int MaxValue)
{
return (value>=MinValue && value<=MaxValue);
}

void readString(char *bufferParameter)
{
int i=0; // We'll use this variable as index of the buffer where we will store data

do
{
bufferParameter[i]=(char) SerialUSB.read(); // it store the read character in the i position of bufferParameter
SerialUSB.print(bufferParameter[i]); // showing it
if (bufferParameter[i]=='\b') // if Backspace was pressed
i--; // it goes to the previous position, rewritting the previoulsy typed character
else //
i++; // it will write in the next position
//    SerialUSB.println(int(bufferParameter[i-1]));
}while(bufferParameter[i-1]!=10); // while the last values is not INTRO. The symmbol ! represents the logical operator NOT

bufferParameter[i]=0; // A NULL (0, zero) is necessary in the last position of any string
}

/*
It read an string, it's converted to integer and returned
*/
int readInteger(char *bufferParameter)
{
//  return SerialUSB.parseInt();

readString(bufferParameter);

//  int valor=int(bufferParameter[0]-int('0'));
debugOutputPairUSB ("Leido: ", bufferParameter);
int valor=myatoi(bufferParameter);

debugOutputPairUSB ("Valor leido: ", valor);

return valor;
}

int getId()
{
/*
We define an array enough large, 256 bytes (characters). Probably it's enough with 4 bytes, but if we type more than the defined size we will get an error*/
char buffer[256];

/*
And we define another integer variable, it's very advisable to asign a value in the definition, in this case we assign the minimun value, 1*/
int ax12Id=1;

do
{ // starting the loop
SerialUSB.println ("Enter the ID of the AX-12 that you wwant to move, between 1 y 18: ");
SerialUSB.print("Id:");
ax12Id=readInteger(buffer); // this function will read from what we type in the keyboard
//// exclamation (!) is the NOT logical operator. It will repeat the loop while the value is not valid
}while(!isValid(ax12Id, 1, 18));

// Showing the typed value
SerialUSB.println(" ");
SerialUSB.print("AX12 ID:");
SerialUSB.println(ax12Id);

return ax12Id;
}

int getPosition()
{
char buffer[256];
int position=0;

do
{
SerialUSB.println ("Enter a value between 0 and 1023 as the goal position");
SerialUSB.print ("Position:");
position=readInteger(buffer);
}while(!isValid(position, 0, 1023));

// Showing the typed value
SerialUSB.println(" ");
SerialUSB.print("Position:");
SerialUSB.println(position);

return position;
}

[/sourcecode]

domingo, 22 de julio de 2012

Raspberry Pi and Pandaboard

Raspberry Pi and Pandaboard embedded programming and robotics

[caption id="attachment_707" align="alignleft" width="300"]Pandaboard and Raspberry Pi Pandaboard and Raspberry Pi[/caption]

In a few days [C# part ìt's already here, very soon the starting of the  C++ part] will start a tutorial about programming Pandaboard and Raspberry Pi, specially oriented towars robotics programming using the wonderful Robotis Bioloid kit.

It will try to explain clearly how to install the Raspbian and Ubuntu GNU Linux operating systems and the GNU C++ development environment.

The C++ robotics tutorial will start with a quick introduction to C++, examples using the AX-12 servos, communications using serial port and wireless connections, and, finally, the development of a 6 wheeled hexapod robot, that will be used to introduce advanced techniques like concurrent programming that the new C++ 11 bring to us.

[caption id="attachment_705" align="alignleft" width="300"]HexaWheels_01 HexaWheels_01[/caption]

By the way, Programming -- Principles and Practice Using C++ by Bjarn Stroustrup (the "father of C++) and C++ Concurreny in Action are two great books that cover wide and wisely all these subjects.

A video (excuse me for the poor quality, it willbe improved) with the first steps of the Raspberry Pi based robot

[youtube http://www.youtube.com/watch?v=Yhv43H5Omfc]

lunes, 7 de mayo de 2012

Programming CM-510 with C: reading values from terminal and moving a Dynamixel AX-12

Programming CM-510 with C: reading values from terminal and moving a Dynamixel AX-12

In this post we are going to ask the ID AX-12+ that we want to move and the goal position.

The explanations are in the code as comments, I hope that there are enough comments to understand it, let me know if you can't understand it.

The main loop is that easy:

[sourcecode language="c"]
int main(void)
{
init();

while(true) // we'll repeat this looop forever
{
int id=getId(); // get the ID of the AX-12 that we want to move
int position=getPosition(); // get the goal position
dxl_write_word( id, P_GOAL_POSITION_L, position); // sent the command to the Dynamixel
}

return 0;
}
[/sourcecode]

A brief explanation of printf: printf function is much more powerful than it seems at a first sight, it admits many parameters that allow us to display a large amount of data types and formats. In In the following example %i means that in that position the message will include an integer that will be passed as a parameter after the string "AX12 ID:". The control character "n" means a line break.

Each character in the string is stored in a memory location [A][X][1][2][ ][I][D] strings are a special case of array.

getID and getPosition are also very easy, isn't?

[sourcecode language="c"]
/*
The next functions asks for the ID of the AX-12 to move, checking that the ID is a value between 1 and 18
*/

int getId()
{
/*
We define an array enough large, 256 bytes (characters). Probably it's enough with 4 bytes, but if we type more than the defined size we will get an error*/
char buffer[256];

/*
And we define another integer variable, it's very advisable to asign a value in the definition, in this case we assign the minimun value, 1*/
int ax12Id=1;

// puts is very similar to printf, it shows the string that it receives as parameter
puts ("nnMoving a Dynamixel");

do
{ // starting the loop
puts ("Enter the ID of the AX-12 that you wwant to move, between 1 y 18, ");
ax12Id=readInteger(buffer); // this function will read from what we type in the keyboard
//// exclamation (!) is the NOT logical operator. It will repeat the loop while the value is not valid
}while(!isValid(ax12Id, 1, 18));

// Showing the typed value
printf("AX12 ID: %in", ax12Id);

return ax12Id;
}

// Now we will repeat almost the same code that above, it should be pretty easy to write a reusable function, isn't?

int getPosition()
{
char buffer[256];
int position=0;

do
{
puts ("Enter a value between 0 and 1023 as the goal position");
position=readInteger(buffer);
}while(!isValid(position, 0, 1023));

printf("nPosition: %in", position);

return position;
[/sourcecode]

The functions used to read the text from the Terminal are quite interesting, showing the use of a string. It also shows how to use the .h file (declaration) and the .c (definitions, the content of the functions):

[sourcecode language="c"]
// Body (content) of the functions that read data

/*
Recibimos una variable que tiene reservado espacio en memoria para almacenar
la cadena introducida
*/

void readString(char bufferParameter[])
{
int i=0; // We'll use this variable as index of the buffer where we will store data
do
{
bufferParameter[i]=getchar(); // it store the read character in the i position of bufferParameter
putchar(bufferParameter[i]); // showing it
if (bufferParameter[i]=='b') // if Backspace was pressed
i--; // it goes to the previous position, rewritting the previoulsy typed character
else //
i++; // it will write in the next position
}while(bufferParameter[i-1]!='n'); // while the last values is not INTRO. The symmbol ! represents the logical operator NOT

bufferParameter[i]=0; // A NULL (0, zero) is necessary in the last position of any string
}

/*
It read an string, it's converted to integer and returned
*/
int readInteger(char bufferParameter[])
{
readString(bufferParameter);
return atoi(bufferParameter);
}
[/sourcecode]

You can download the sourcecode here

The language C, also C++, has some very interesting features such as the inclusion of code depending on certain conditions. This lets you use the same code for different processors by simply changing one or more parameters.

As an example, this ZIP contains a project for Dev-CPP with a version of the source files for the PC and the CM-510; simply commenting or uncommenting a line in the file "myCM510.h" (for AVR Studio you should create the appropriate project and include the sources files).

Instead of moving AX-12 it displays the text "dxl_write_word" with the parameters received. We can practice C and perform different tests on the PC without connecting any servo.

martes, 1 de mayo de 2012

Bioloid CM-510 programming tutorial: First steps with C

Bioloid programming workshop: First steps with C

(En español)

This brief post starts the Bioloid programming workshop, using ​C, C + + and C# languages  and different controllers: ATMega (CM-510), PC, SBC.

The first steps in C programming

C language is a simple, powerful and extremely versatile tool used to develop software for industries as diverse as the automobile , medical equipment or for the software industry itself, from Microsoft Office to operating systems like Windows or Linux.

This will be a very practical programming workshop with Robotis Dynamixel servos, so I will include links tutorials anb books that include broader and deeper explanations, like C introduction (pdf). But there are a lot:

C Language Tutorial (html)
How C Programming Works (html)
Several C programming tutorials (html)

One of the simplest programs in C:

[sourcecode language="c"]
// This line that begins with two slashes is a comment

/*
These others, starting with a slash and an asterisk
are a comment too, ending with another asterisk and a slash.

The comments are very useful for explaining what we do and,
especially, why we do so, because after a few months we will not remember the details.
*/

/*
The includes are useful to announce the compiler that we will use
existing functions from other files, such as stdio.h, in this example,  to get
the printf function to display information on screen.
(This is not exactly true, but more on that later)
*/
#include

/*
This is one way to start a C program,
Creating the main function as the starting point of every C program:
*/
void main ()

// The body or content of the function starts with the following curly bracket
{

// Guess what does the following function?
printf ("Hello, World");

// And, predictably, the function ends with the closing curly bracket
}
[/sourcecode]

Now we will write the first program for the CM-510

But previously you should install the software needed to program the CM-510. If you install WinAVR in "C:tools WinAVR-20100110" you can download a zip with everything ready to use.

After loading our program in the CM-510, to use RoboPlus Tasks, Motion RoboPlus Robotis and other programs, we will have to restore Robotis firmware.

[sourcecode language="c"]
# Include stdio.h
# Include "myCM510.h"

executeMovement1 void (int ax12Id)
{
dxl_write_word (ax12Id, P_GOAL_POSITION_L, 512);
}

executeMovement2 void (int ax12Id)
{
dxl_write_word (ax12Id, P_GOAL_POSITION_L, 600);
}

int main (void)
{
ax12Id int = 6;

init ();

printf ("\r \n A simple example");

printf ("\r \n Perform movement 1 with the AX-12% i", ax12Id);
executeMovement1 (ax12Id);

printf ("\r \n Pause half a second");
_delay_ms (500); // half-second pause

printf ("\r \n Beep!");
buzzOn (100); // beep

printf ("\r \n Pause for a second");
_delay_ms (1000); // pause for 1 second

printf ("\r \n Perform movement 2 with the AX-12% i", ax12Id);
executeMovement2 (ax12Id);

printf ("\r \n End");
}
[/sourcecode]

The characters "\r \n" are used to jump to the next line in Windows.

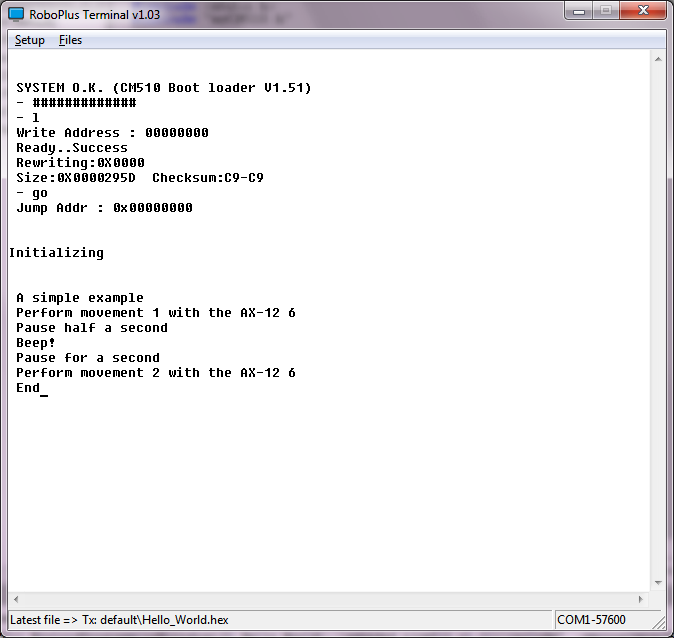
If you have installed the necessary software (WinAVR must be installed in "C:tools WinAVR-20100110") and unzip this zip file in the root directory (C: ) you have to be ready to modify, compile, or simply load the executable "hello_world.hex" in the CM-510. You will see something similar to:

[caption id="attachment_584" align="aligncenter" width="300"]01_Hello_World_CM-510 01_Hello_World_CM-510[/caption]

Some explanations
dxl_write_word (ax12Id, P_GOAL_POSITION_L, 600);

This function is included in the Robotis CM-510 libraries allowing us to send commands to a Dynamixel actuator very easily. We only have to indicate the ID of the AX-12 to move (ax12Id), the code of the order that the AX-12 should execute, in this case go to the goal position (P_GOAL_POSITION_L), and the position in which has to be placed between 0 and 1024 (600 in the example).

dx_series_goal


Highlights:

Decompose the program into different parts

  •     Having previously created the init () function in myCM510.h/myCM510.c allows us to include it easily in this program.

  •     In addition to simplifying programming we can reuse the same code in different programs. This saves us from having to repeat the same code many times and, especially, have to correct faults or improve in only one point, . Later we will see how to organize directories and even how to create libraries.

  •     It also allows us to encapsulate the details, so that when the program starts growing we can handle them easily without being overwhelmed.


Showing what is doing running the program


Using the printf function we can send text to the screen that lets us know what is doing the program (printf sends to the serial port, "RoboPlus Terminal" read it  and displays it on the screen. We will lear how to read from the serial port when we start programming Bioloid using a PC or SBC)

Can you think of an easy way to avoid having two similar functions such as "void executeMovement1 (int ax12Id)" and "void executeMovement2 (int ax12Id)"?

lunes, 5 de marzo de 2012

Linux C++ Dynamixel reading and writing example

If you will like to use some boards like Raspberry or Beagleboard C++ is a great choice. So here you have a working Linux C++ Dynamixel reading and writing example. The main difference is the serial port access:

Here you can download the Eclipse project zipped

Here you can find several combinations of hardware, firmware and programming tools.

The main body


[sourcecode language="cpp"]
#include <iostream>
using namespace std;

#include "SerialPort.h"
#include "Dynamixel.h"

int main() {
cout << "AX Control starts" << endl; // prints AX Control

int error=0;
int idAX12=18;

SerialPort serialPort;
Dynamixel dynamixel;

if (serialPort.connect("//dev//ttyS0")!=0) {
dynamixel.sendTossModeCommand(&serialPort);

int pos=dynamixel.getPosition(&serialPort, idAX12);

if (pos>250 && pos <1023)
dynamixel.setPosition(&serialPort, idAX12, pos-100);
else
printf ("nPosition <%i> under 250 or over 1023n", pos);

serialPort.disconnect();
}
else {
printf ("nCan't open serial port");
error=-1;
}

cout << endl << "AX Control ends" << endl; // prints AX Control
return error;
}
[/sourcecode]

Header


[sourcecode language="cpp"]
#ifndef SERIALPORT_H_
#define SERIALPORT_H_

#include <stdio.h>
#include <termios.h>
#include <fcntl.h>
#include <unistd.h>

class SerialPort {
private:
int fileDescriptor;

public:
int connect ();
int connect (char * device);
void disconnect(void);

int sendArray(unsigned char *buffer, int len);
int getArray (unsigned char *buffer, int len);

int bytesToRead();
void clear();
};

#endif /* SERIALPORT_H_ */
[/sourcecode]

Body:


[sourcecode language="cpp"]
#include <string.h>
#include <sys/ioctl.h>

#include "SerialPort.h"

int SerialPort::connect() {
return connect("//dev//ttyS0");
}

int SerialPort::connect(char *device) {
struct termios terminalAttributes;

/*
* http://linux.die.net/man/2/open
*
* Open the serial port
* read/write
* not become the process's controlling terminal
* When possible, the file is opened in nonblocking mode
*
*/
fileDescriptor = open(device, O_RDWR | O_NOCTTY | O_NDELAY | O_FSYNC );

// clear terminalAttributes data
memset(&terminalAttributes, 0, sizeof(struct termios));

/*    http://linux.die.net/man/3/termios
*
*  control modes: c_cflag flag constants:
*
* 57600 bauds
* 8 bits per word
* Ignore modem control lines.
* Enable receiver.
*/

terminalAttributes.c_cflag = B57600 | CS8 | CLOCAL | CREAD;

/*
* input modes: c_iflag flag constants:
*
* Ignore framing errors and parity errors.
* (XSI) Map NL to CR-NL on output.
*/
terminalAttributes.c_iflag = IGNPAR |  ONLCR;

/*
* output modes: flag constants defined in POSIX.1
*
* Enable implementation-defined output processing.
*/

terminalAttributes.c_oflag = OPOST;

/*
* Canonical and noncanonical mode
*
* min time
* min bytes to read
*/

//terminalAttributes.c_lflag = ICANON;
terminalAttributes.c_cc[VTIME] = 0;
terminalAttributes.c_cc[VMIN] = 1;

/*
* http://linux.die.net/man/3/tcsetattr
* Set the port to our state
*
* the change occurs immediately
*/

tcsetattr(fileDescriptor, TCSANOW, &terminalAttributes);

/*
* http://linux.die.net/man/3/tcflush
*
* flushes data written but not transmitted.
* flushes data received but not read.
*/

tcflush(fileDescriptor, TCOFLUSH);
tcflush(fileDescriptor, TCIFLUSH);

return fileDescriptor;
}

void SerialPort::disconnect(void)
{
close(fileDescriptor);
printf("nPort 1 has been CLOSED and %d is the file descriptionn", fileDescriptor);
}

int SerialPort::sendArray(unsigned char *buffer, int len) {
int n=write(fileDescriptor, buffer, len);
return n;
}

int SerialPort::getArray (unsigned char *buffer, int len)
{
int n1=bytesToRead();
int n=read(fileDescriptor, buffer, len);
return n;
}

void SerialPort::clear()
{
tcflush(fileDescriptor, TCIFLUSH);
tcflush(fileDescriptor, TCOFLUSH);
}

int SerialPort::bytesToRead()
{
int bytes=0;
ioctl(fileDescriptor, FIONREAD, &bytes);

return bytes;
}
[/sourcecode]

martes, 7 de febrero de 2012

Choose hardware, firmware and language

There are a lot of possible combinations of hardware, firmware and languages for programming Bioloid. I think that the table below show the the main combinations.

You can choose from the easy but limited Robotis own tool (Roboplus Task) and only your CM-5 or CM-510 to a SBC or "embedded" PC like Roboard and any language which can manage a serial port connection, like C, C++, Java, Python,...

Linux C++ Dynamixel reading and writing example

C# Dynamixel reading and writing example

Practical C++ programming tutorial for Bioloid

[caption id="attachment_256" align="aligncenter" width="617"]Programming Bioloid: choose hardware, firmware and languages Programming Bioloid: choose hardware, firmware and languages[/caption]

Robotis officially supports the programming solutions with the blue background:

  • The dark blue, RoboPlus Tasks, is the only one in which you can create the motions with RoboPlus Motion and execute it in CM-5/CM-510 with the program create with RoboPlus Tasks, after downloading the generated executable into the CM-5/CM-510, of course.


With these programming solutions you can use the Zigbee SDK to send and receive data between the CM5-/CM-510 and any computer, using Zig-110A or the new bluetooth BT-110, the Zig2Serial and the USB2Dynamixel. You can download example in Visual Basic .Net, C# and Visual C++

But there are more options!

Using a PC, SBC (Single Board Computer), PDA, Mobile or other light and battery powered computer

Using a serial port connection with your more beloved programming language:

  • USB2Dynamixel


If you have any device with a USB host and a FTDI driver you can use USB2Dynamixel to command programatically your Dynamixel servos using the Dynamixel protocol. You only will need your CM-5 or CM-510 to connect your Dynamixel to the battery.

  • Serial port cable


Same as the previous option but instead of using the USB2Dynamixel you only will need the serial cable and the "Toss Mode" launched with the 't' command from the "Manage Mode"


  • Wireless control


Instead of only sending and receiving data, with the previous wireless connections you can command remotely your robot using the standard firmware and the "Toss Mode" launched with the 't' command from the "Manage Mode". You will need to command it using the Dynamixel protocol.

With these options and the CM-510 you will find a little problem... there is no way to read your sensor values! Well, you can use this firmware that offers a "Toss Mode" that supports reading CM-510 ports.

Start learning!

If you want to start learning how to program your CM-5 or CM-510 controller you will find interesting this post "Start programming  CM-5/CM-510 in C". But may be you prefer to control your robot from a PC, SBC or other computer in C++ or C#

martes, 20 de diciembre de 2011

C# Dynamixel reading and writing example

Three C# classes for a simple example for reading and writing the position of a AX-12 Dynamixel servo. You can use it with the USB2Dynamixel or using only the serial port: in "Manage mode" send "T" to put firmware in "Toss Mode".

Here you can find several combinations of hardware, firmware and programming tools.

The main


.

[sourcecode language="csharp"]
class Program
{
static void Main(string[] args)
{
int error=0;
int idAX12=15;

SerialPort2Dynamixel serialPort = new SerialPort2Dynamixel();
Dynamixel dynamixel = new Dynamixel();

if (serialPort.open("COM1")==false) {
dynamixel.sendTossModeCommand(serialPort);

int pos=dynamixel.getPosition(serialPort, idAX12);

if (pos>250 && pos dynamixel.setPosition(serialPort, idAX12, pos-100);
else
Console.Out.WriteLine("nPosition under 250 or over 1023", pos);

serialPort.close();
}
else {
Console.Out.WriteLine("nCan't open serial port");
error=-1;
}
}
}
[/sourcecode]

Serial Port


[sourcecode language="csharp"]
public class SerialPort2Dynamixel
{
const int HeaderSize = 4;
const int PacketLengthByteInx = 3;
const int BufferSize = 1024;
const int MaximuTimesTrying = 250;
const int waitTime = 5;

private string portName = "COM3";

private byte[] buffer = new byte[BufferSize];

private SerialPort serialPort = new SerialPort();

public bool open(String com)
{
bool error = false;
portName = com;

serialPort.PortName = com;
serialPort.BaudRate = 57600;
serialPort.DataBits = 8;
serialPort.Parity = Parity.None;
serialPort.StopBits = StopBits.One;

try
{
if (serialPort.IsOpen)
Console.WriteLine("Serial port is already open");
else
serialPort.Open();
}
catch (Exception exc)
{
Console.WriteLine(exc.Message);
error = true;
}

return error;
}

public void close()
{
if (serialPort.IsOpen)
serialPort.Close();
Console.WriteLine("Conecction closed!");
}

private void cleanConnection()
{
serialPort.DiscardInBuffer();
}

public byte[] query(byte[] buffer, int pos)
{
byte[] outBuffer = null;
try
{
serialPort.Write(buffer, 0, pos);
System.Threading.Thread.Sleep(waitTime);
outBuffer = rawRead();
}
catch (Exception exc)
{
Console.Out.WriteLine(exc.Message);
}

return outBuffer;
}

public void rawWrite(byte[] buffer, int pos)
{
try
{
serialPort.Write(buffer, 0, pos);
}
catch (Exception exc)
{
Console.Out.WriteLine(exc.Message);
}
}

public byte[] rawRead()
{
byte[] localbuffer = null;
int n = serialPort.BytesToRead;
if (n != 0)
{
localbuffer = new byte[n];
try
{
serialPort.Read(localbuffer, 0, n);
}
catch (Exception exc)
{
Console.Out.WriteLine(exc.Message);
}
}
return localbuffer;
}
}<code>
[/sourcecode]

Dynamixel


[sourcecode language="csharp"]
class Dynamixel
{
protected static int MaxBufferSize = 1024;
protected byte[] buffer = new byte[MaxBufferSize];

private static byte checkSumatory(byte[] data, int length)
{
uint cs = 0;
for (int i = 2; i < length; i++)
{
cs += data[i];
}
cs = ~cs;
return (byte)(cs & 0x0FF);
}

public static void toHexHLConversion(int pos, out byte hexH, out byte hexL)
{
ushort uPos = (ushort)pos;
hexH = (byte)(uPos >> 8);
hexL = (byte)uPos;
}

public static ushort fromHexHLConversion(byte hexH, byte hexL)
{
return (ushort)((hexL << 8 ) + hexH);
}

public static short fromHexHLConversionToShort(byte hexH, byte hexL)
{
return (short)((hexL << 8 ) + hexH);
}

public static void toHexHLConversion(int pos, out string hexH, out string hexL)
{
string hex;
int lon, start;
hex = String.Format("{0:X4}", pos);
lon = hex.Length;
if (lon < 2)
{
hexL = hex;
hexH = "0";
}
else
{
start = lon - 2;// lon = 4, start = 2; lon=3, start=1
hexL = hex.Substring(start);
hexH = hex.Substring(0, start);
}
}

public void sendTossModeCommand(SerialPort2Dynamixel sp2d)
{
byte[] buffer = { (byte)'t', (byte)'r' };
sp2d.rawWrite(buffer, 2);
System.Threading.Thread.Sleep(100);
sp2d.rawRead();
}

private static int getReadPositionCommand(byte[] buffer, byte id)
{
//OXFF 0XFF ID LENGTH INSTRUCTION PARAMETER1 …PARAMETER N CHECK SUM
int pos = 0;
buffer[pos++] = 0xff;
buffer[pos++] = id;
buffer[pos++] = 4; // bodyLength = 4
buffer[pos++] = 2; //the instruction, rawRead => 2

// pos registers 36 and 37
buffer[pos++] = 0x24;

//bytes to rawRead
buffer[pos++] = 2;

byte checksum = checkSumatory(buffer, pos);
buffer[pos++] = checksum;

return pos;
}

private static int getSetPositionCommand(byte[] buffer, byte id, short goal)
{
int pos = 0;
byte numberOfParameters = 0;
//OXFF 0XFF ID LENGTH INSTRUCTION PARAMETER1 …PARAMETER N CHECK SUM

buffer[pos++] = 0xff;
buffer[pos++] = id;

// bodyLength
buffer[pos++] = 0; //place holder

//the instruction, query => 3
buffer[pos++] = 3;

// goal registers 30 and 31
buffer[pos++] = 0x1E;// 30;

//bytes to write
byte hexH = 0;
byte hexL = 0;
toHexHLConversion(goal, out hexH, out hexL);
buffer[pos++] = hexL;
numberOfParameters++;
buffer[pos++] = hexH;
numberOfParameters++;

// bodyLength
buffer[3] = (byte)(numberOfParameters + 3);

byte checksum = checkSumatory(buffer, pos);
buffer[pos++] = checksum;

return pos;
}

public short getPosition(SerialPort2Dynamixel sp2d, int id)
{
//byte[] localbuffer = new byte[MaxBufferSize];
int size = getReadPositionCommand(buffer, (byte)id);
byte[] res = sp2d.query(buffer, size);

short position = -1;

if (res != null)
{
int length = res.Length;
if (res != null && length > 4 && res[4] == 0)
{
byte l = 0;
byte h = res[5];
if (length > 6)
{
l = res[6];
}

position = fromHexHLConversionToShort(h, l);
}
}

return position;
}

public bool setPosition(SerialPort2Dynamixel sp2d, int id, int goal)
{
bool couldSet = false;

short position = (short)goal;
int size = getSetPositionCommand(buffer, (byte)id, (short)goal);
byte[] res = sp2d.query(buffer, size);

//ushort value = 1;
if (res != null && res.Length > 4 && res[4] == 0)
couldSet = true;

return couldSet;
}
}
[/sourcecode]

The zip with the full example for Visual Studio 2008

sábado, 10 de diciembre de 2011

Writing Dynamixel AX-12+ position

The intent of this code is to be clear and easy to understand, it not pretend to be the best code to do the job.

This method create the command to write the AX-12+ position :

[sourcecode language="cpp"]
int Dynamixel::getSetAX12PositionCommand(byte id, short goal)
{
int pos = 0;
byte numberOfParameters = 0;
//OXFF 0XFF ID LENGTH INSTRUCTION PARAMETER1 …PARAMETER N CHECK SUM

buffer[pos++] = 0xff;
buffer[pos++] = id;

// bodyLength
buffer[pos++] = 0; //place holder

//the instruction, query => 3
buffer[pos++] = 3;

// goal registers 30 and 31
buffer[pos++] = 0x1E;// 30;

//bytes to write
byte hexH = 0;
byte hexL = 0;
toHexHLConversion(goal, &hexH, &hexL);
buffer[pos++] = hexL;
numberOfParameters++;
buffer[pos++] = hexH;
numberOfParameters++;

// bodyLength
buffer[3] = (byte)(numberOfParameters + 3);

byte checksum = checkSumatory(buffer, pos);
buffer[pos++] = checksum;

return pos;
}

int Dynamixel::setPosition(SerialPort *serialPort, int idAX12, int position)
{
int error=0;

int n=getSetAX12PositionCommand(idAX12, position);
long l=serialPort->sendArray(buffer,n);
Sleep(10);

memset(bufferIn,0,BufferSize);
n=serialPort->getArray(bufferIn, 8);

if (n>4 && bufferIn[4] == 0)
printf("nid=<%i> set at pos=<%i>n", idAX12, position);
else {
error=-1;
printf("nid=<%i> error: <%i>n", idAX12, bufferIn[4]);
bf(bufferIn, n);
}

return error;
}

[/sourcecode]

miércoles, 23 de noviembre de 2011

Reading Dynamixel AX-12+ position

The intent of this code is to be clear and easy to understand, it not pretend to be the best code to do the job.

This method create the command to read the AX-12+ position :

[sourcecode language="cpp"]
int Dynamixel::getReadAX12PositionCommand(byte id)
{
//OXFF 0XFF ID LENGTH INSTRUCTION PARAMETER1 …PARAMETER N CHECK SUM
int pos = 0;

buffer[pos++] = 0xff;
buffer[pos++] = id;

// length = 4
buffer[pos++] = 4; //placeholder

//the instruction, read => 2
buffer[pos++] = 2;

// pos registers 36 and 37
buffer[pos++] = 36;

//bytes to read
buffer[pos++] = 2;

byte checksum = checkSumatory(buffer, pos);
buffer[pos++] = checksum;

return pos;
}

int Dynamixel::getPosition(SerialPort *serialPort, int idAX12)
{
int ret=0;

int n=getReadAX12PositionCommand(idAX12);
long l=serialPort->sendArray(buffer,n);
Sleep(2);

memset(bufferIn,0,BufferSize);
n=serialPort->getArray(bufferIn, 8);

short pos = -1;
if (n>7)
{
pos = fromHexHLConversion(bufferIn[5], bufferIn[6]);
}

printf("nid=<%i> pos=<%i> length=<%i>n", idAX12, pos, n);
if (pos<0 || pos > 1023)
ret=-2;
else
ret=pos;

return ret;
}
[/sourcecode]

martes, 22 de noviembre de 2011

Start programming CM-5/CM-510 in C (AVR microcontrollers)

From time to time I receive questions about how to start programming the CM-5/CM-510 with C.

[This post is also in spanish]

I think it’s necessary to have a working knowledge about:

1. C programming

2. CM-5/CM-510 programming

3. Dynamixel protocol

You can find  a lot of information about CM-510 / CM-700  programming at Robotis support website And here you can learn how to create a simple "Hello World" program for CM-5

1. C programming

I think “C Programming for Microcontrollers is a fast and very practical introduction to C and microcontrolers programming, but I’m a not sure if it an easy way to start learning C.If you a want a more structured and deeper introduction to the C programming language, this is a pretty good and free introduction:


C introduction (pdf)


But there are a lot…


C Language Tutorial (html)
How C Programming Works (html)
Several C programming tutorials (html)


and more from Google


2. CM-5/CM-510 programming

From Robotis support website CM-5/CM-510 programming


3. Dynamixel protocol

From Robotis support website Dynamixel actuator


4. Your first step

If you use a CM-510 you will find here at Robotis support site a lot of information, and if you use the CM-5 you will find in this post some useful information and links


Two others great sources of information are:

Robosavvy Bioloid information wiki


Source code of Stuart&Matt library